Tea Soaked Fruit Cake

This cake recipe is one I came across recently and I like it because it uses tea – a drink well loved in Poland.

It is similar to a keks which is usually made in a loaf tin but I like to make this one in a round tin.

The recipe uses 8 tea bags and I think Earl Grey,  Lady Grey & Empress Grey tea bags are really good. (If you do not have tea bags then use 8 teaspoons of loose tea, but have it in a muslin bag as you do not want the tea leaves in the cake.)

I have used dried fruits consisting just of currants, raisins, sultanas & peel.

You could make it more Polish by using a bakalie mixture which also has chopped dates, figs & prunes, however I would not add nuts – or if you want to use them – add them after the overnight soaking.

Ingredients

500g mixed dried fruit

8 tea bags (Earl Grey, Lady Grey or Empress Grey)

300ml boiling water

500g self-raising flour

325g butter or block margarine

1 teaspoon mixed spice

pinch of salt

5 eggs

Method

Place the teabags in a large bowl and add the boiling water and stir to make a very strong tea.

Add the dried fruit and stir well.

Leave the fruit to soak overnight.


Pre-heat your oven to GM 3 ,  150°C.

Grease and line a 23cm loose bottom or a spring-form tin.

Place the flour and butter or margarine into a large bowl and use your finger tips to rub in the fat until the mixture looks like breadcrumbs.

In a bowl mix the sugar, salt & mixed spice thoroughly.

Add the sugar mixture to the flour & butter mixture and stir well.

Add the eggs and the soaked fruit and all the remaining liquid and stir well.


Pour the mixture into the baking tin and level the top.

Bake in the  oven for 1 hour 40 minutes.

Check after an hour and place a piece of foil or greaseproof  paper on the top if it is beginning to burn.

Check to see if the cake is done with a cake tester or skewer.

NoteThis cake is large and you run the risk of having it underdone in the middle – make sure it is cooked in the middle when testing.

Leave to cool in the tin.

P1030671


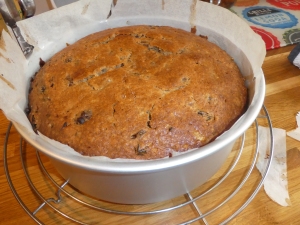
Served on tea plates – Greenway  Hostess – design by John Russell, 1960 – 1979.

Smaller Sized Cake

This cake is large so I thought I would have a go at making a smaller version.

There are 5 eggs in the original recipe so I  decided to do a 3 egg version.

To make it more Polish, I used a bakalie mixture which had chopped dates, figs, peel & prunes as well as the currants, raisins & sultanas.

Ingredients

300g bakalie or dried mixed fruit

5 tea bags (Earl Grey, Lady Grey or Empress Grey)

200ml boiling water

300g self-raising flour

200g butter or block margarine

1 teaspoon mixed spice

pinch of salt

3 eggs


Method

As above – using a 20cm tin.

Bake for around 1 hour 20 minutes – checking after 50 minutes and covering if necessary with a piece of greaseproof paper to stop the top burning.

Note

Maybe because of the different dried fruits I thought it came out drier than the large one & I served it sliced with some butter.

However I have found that if you wrap the cake in aluminium foil for a day or two – it improves – becoming  more moist.


Served on tea plates – La prune – by Jet for Ter Steege in The Netherlands.

Bean Fritters

The Polish for these is kotlety z fasoli  – cutlets from beans.

The word kotlety(plural) comes from the Italian word cotoletta(singular) for cutlet or chop.

Phaseolus vulgaris, common bean, originated from Central and South America, where it was cultivated as early as 6,000 BC in Peru and 5,000 in Mexico.  it was introduced to the Old World by the Spanish and the Portuguese.

It is a legume which means it is a plant that has its seeds contained in a shell or pod.

Most of the recipes in my books use dried beans and they are prepared by soaking them overnight and then boiling them for the required amount of time.

For ease I usually use tinned beans.

You can use haricot beans (wash off the sauce from baked beans), cannellini (white kidney) beans, butter beans and many others.

Ingredients

2 tins of beans

1 onion

butter for frying the onion

1 teaspoon of mixed herbs or Italian herbs

1 egg

1 – 2 tablespoons of potato flour

Dried breadcrumbs

Salt & ground black pepper

Sunflower oil for frying

Method

Chop the onion into small pieces and gently fry in butter.

Leave to cool completely.


Rinse and drain the beans from the tins.


Pat the beans dry with kitchen roll or a clean tea towel.

Mash the beans until you have a thick smooth paste.


Add the onions and the mixed herbs.

Add the egg and mix well.

Add the potato flour to make the mixture thick.

Add salt & ground black pepper

Cover a plate or board with dried breadcrumbs.

Make flattened balls from the mixture – coating them on all sides with breadcrumbs.

Fry the fritters in hot sunflower oil.


They can be kept warm in the oven whilst you cook them in batches.

They can be reheated in the oven at GM5 – 190°C – for around 15 minutes.

Bean Fritters with Peppers & Chilli

This is a variation on the above recipe – to the mixture as above you add – 2 chopped peppers & 1-2 medium chillies or 2-3 small chillies, which have all been softened by gently frying in some butter and then added to the onion mixture. You can also add some chilli flakes.


Continue as above


Both versions of these fritters go well with a crisp salad, salsa or a sauce such as tomato or mushroom.  They also go well with meat dishes in a sauce  such as gulasz, pulpety or chicken casserole.

Save

Placek

Placek is a low flat cake and can be  round or rectangular in shape.

I made two using  each of the recipes in  ciasto półkruche  – a type of shortcrust pastry – with jam fillings and both turned out well.

Placek with jam

Grease and line a 32 x 22 tin

Pre-heat the oven  GM5 – 190°C

Use half the dough and roll it out to fit the tin.

Spread the dough with jam – you will need around a jar.

Cover the top with the rest of the dough rolled out.

Bake for around 30 minutes.

Dust with icing sugar as soon as you take it out of the oven and leave to cool.

Placek with Blackcurrant Jam


Served on – Colclough – Enchantment-  1950 – 1960s

Placek with Sour Cherry Jam


Served on – Duchess – Bramble Rose – 1960s


Vegetable Fritters

The Polish for these is kotlety z jarzyn  – cutlets from vegetables.

The word kotlety(plural) comes from the Italian word cotoletta(singular) for cutlet or chop.

These are made with boiled or steamed vegetables.

Root vegetables are good here as well as cooked cabbage – you can also add cooked pulses such as peas and beans –  I am writing a post just about bean fritters which will be posted soon.

The following vegetable are ones I often use: cabbage, carrots, celeriac, cauliflower, parsnip and potato.

The cooked vegetables need to be chopped fine, minced or mashed – whichever is more suitable or easiest.

For this post I cooked the vegetables especially but this is a good way to use up any leftover cooked vegetables.

Ingredients

  • Around 500g of cooked vegetables – chopped, mashed or minced as appropriate.
  • 2 onions – chopped fine
  • Butter to fry the onions
  • 1 egg (can add another egg yolk as well)
  • 2 – 3 tablespoons of potato flour – depends on how moist or starchy the vegetables are.
  • Salt & pepper
  • Dried Breadcrumbs
  • Sunflower oil for frying
  • Extras – you can add chopped parsley, dill or chives or any other herbs you like.

Method

Chop fine, mash or mince the vegetables as appropriate.

Chop the onions and fry them gently in butter till golden and leave to cool.

  • Mix the vegetables and the onion together.
  • Add the egg and mix well.
  • Add enough potato flour to make the mixture fairly stiff.
  • Add salt and pepper.
  • Put dried breadcrumbs on a board or large plate.
  • Make largish balls of the mixture and flatten them onto the breadcrumbs, turn them over  and cover all the sides.
  • Fry them gently in hot sunflower oil.
  • You can keep them warm on a baking tray in the oven whilst making the rest.

Reheating

I like these reheated – Place them on a baking tray into a pre-heated hot oven GM6  200°C for around 15  minutes.

The combinations are endless – here are some ideas ….

Cauliflower & Spring Onions or Chives

As in the instructions above with the addition of chopped spring onion (the green part) or chives.

Carrot & Parsnip

Carrot, Potato & Peas

.

Buckwheat

Buckwheat (Fagopyrum tataricum) is gryka  in Polish – and I have written already about the use of its flour to make bliny & pancakes.

Buckwheat is not a grain but a seed – however  it is classed under grains for culinary purposes.

The small triangular seeds have a strong scent which is quite distinctive.

In the United States – they are called groats.

Kasza porridge – is very popular in Poland and refers to grains or seeds boiled in water or milk – usually served salted  – rather than sweet.

Kasza gryczanna is cooked buckwheat and  was eaten in Poland long before the introduction of the potato in the 18th century

You can get  buckwheat grains  which are roasted or not roasted.

You can get loose grains & if you are cooking these you need twice as much water by volume as the buckwheat and you simmer this gently with a lid on the pan, until all the water is absorbed.

Then add a large knob of butter (or bacon fat) and place this in an oven-proof dish with a lid or covered in foil and placed in a low oven for at least 20 minutes.

Note

In olden times the dish could be covered with a pillow or small duvet to keep it warm for hours – so it could be prepared early on for eating later.

This is similar to using a hay box which was much used in England in earlier times.

An easy way of cooking the buckwheat is to use the boil in the bag method.

You can buy packets of buckwheat which come in 4 x 100g perforated bags.

Place the bag in 1 litre of salted boiling water and simmer with the lid on for 15 minutes.


Then empty the grains out of the bag and add a large knob of butter and place this in an oven-proof dish with a lid or covered in foil and place in a low oven for at least 20 minutes.


Because of the distinctive strong taste of the buckwheat it is best served with food with “robust” flavours such as beef or pork gulasz.


You can reheat the boiled buckwheat by frying it gently in butter, with fried onion or with skwarki*.


*Skwarki

Skwarki are crisp smoked bacon bits. My mother would use streaky bacon and cut this into little squares and heat them in a frying pan so all the fat would come out.

Other people might use a more fatty, smoked belly pork to make skwarki.

This smoked streaky bacon was quite lean!


Are lardons the same as skwarki?

I have been trying to get a definitive answer to this for ages!

Well  – Yes & No or They can be!

As I understand it lardons are cubes of pork belly which may or may not be smoked.

Swarki for me will always be smoked and the pieces are small flat pieces rather than cubed.


Sponge with Sour Cherry Jam

Wiśnie  is the Polish for sour cherries  which I have described in More Duck.

Having made sponge with sweet orange jam I thought I would try this with sour cherry jam – the one I used is from Lidl and is very good with a sharp sour taste. The taste goes really well with the  dark chocolate.


I made an English style sponge for ease.

Ingredients

2 eggs

75g caster sugar

75g self raising flour

Method

Pre-heat the oven to GM4 – 180°C

Grease and line the base of  a round 18cm diameter  baking tin.

In a bowl whisk the eggs and caster sugar until they are pale and creamy.

Gently fold in the flour.

Pour the mixture into the tin and bake for 20 – 25 minutes until golden.


You will need around 3 to 4 tablespoons of jam.

Warm the jam slightly to make it easier to spread.

Sandwich the cake halves together with the jam.


Make a dark chocolate glaze as in mazurek  using yeast dough  and again in mazurek with oranges.


Here served on Royal Doulton – Counterpoint  1973 – 1987.


Sponge with Sweet Orange Jam

This cake was inspired firstly by mazurek with oranges and also by the very British Jaffa cakes.

Jaffa cakes were first made in 1927 by McVitie & Price (Established in Edinburgh in 1830)  – little sponges with orange jelly and a chocolate topping – named after the port (now called Tel Aviv) from where the Victorians and Edwardians imported oranges).

A fat-free sponge cake is cut in half and sandwiched together with a sweet orange jam and then covered  with a chocolate glaze or icing.

I have tried out several versions – and made a fat-free sponge using  the recipe with  potato flour   this time using a round 19cm baking tin which has been greased and lined with a circle of greaseproof paper on the base and baked for 20 – 25 minutes at GM4 – 180°C


A quicker version is to use a more English sponge recipe ( this has slightly less volume so a smaller baking tin is used).

Ingredients

  • 2 eggs
  • 75g caster sugar
  • 75g self raising flour

Method

  • Pre-heat the oven to GM4 – 180°C
  • Grease and line the base of  a round 18cm diameter  baking tin.
  • In a bowl whisk the eggs and caster sugar until they are pale and creamy.
  • Gently fold in the flour.
  • Pour the mixture into the tin and bake for 20 – 25 minutes until golden.


  • Leave to cool and cut the sponge in half


20170804_090748
Orange & Elderflower Jam from IKEA
  • Warm the jam slightly to make it easier to spread.
  • Sandwich the cake halves together with the jam.

Chocolate glaze – using the one from Mazurek – with Yeast Dough


Served on Bramble Rose by Duchess from the 1960s


The more milk chocolate icing below is the one from chocolate babka.


Served here on tea plates by Spencer Stevenson Co Ltd 1948 – 1960, design name not known.


Mazurek with Oranges

This mazurek is one my mother used to make. She used the peanut butter base for sernik as the base.

20170809_153901

This quantity of pastry is enough for a small tin – 26cm x 16cm.

Grease and line the tin.

Pre-heat the oven to GM5 – 190ºC

Press the pastry into the tin and prick the surface of the pastry


Bake for approximately 20 minutes.

Leave the base to cool completely.

The original recipe used a sweet orange jam/sauce  which you made from sweet eating oranges. After a while my mother improvised and used English orange marmalade to which she added a little water and some sugar and heated this up for a few minutes.

Use the orange/marmalade  mixture whilst it is still slightly warm and pour this onto the base.

I have now found a jam from IKEA which is orange & elderflower , this has a really nice flavour – warm this slightly so it is easy to spread onto the base.

You need 3-4 tablespoons of jam.

20170804_090748


Leave the orange jam to cool completely.


Over the orange jam is then poured a chocolate topping.

I have used the one from Mazurek – Using Yeast Dough yeast dough.

Chocolate topping

Ingredients

50g butter

30g of granulated sugar

2 tablespoons of cocoa

2 tablespoons of water

Method

In a small saucepan gently melt the butter and sugar .

Add the cocoa and water and mix it till it is all blended together.

Heat this on a low heat – stirring all the while.

Allow to cool slightly and then pour this over the jam.


Tea plates Las Palmas by Aynsley from the 1960s.


Sernik Base with Peanut Butter

My mother often used this base when she made her sernik (baked cheesecake)  – it is a recipe she used in later years as the use of peanut butter is not at all traditionally Polish!

Ingredients

110g butter or block margarine

90g caster sugar

175g plain flour

1 egg yolk

1 tablespoon of peanut butter (I prefer to use crunchy)

Grated rind of 1 lemon

Method

In a large mixing bowl, cream together the butter and sugar.

Add the lemon rind, egg yolk  and peanut butter and cream again.

Mix in the flour with a wooden spoon and then using your hand bring this all together to form a soft dough.

Place the dough in a fridge for several hours.


Pre-heat the over to GM5 – 190°C

Use a loose bottom tin (or spring-form tin)  22cm or 20 cm in diameter.

Grease the base and sides of the tin.

Press the dough onto the base of the tin.

Prick the surface of the dough with a fork.

Bake for around 15 – 20 minutes until the top is golden.

Let the base cool completely before using it.


Using The Base

The base must be thoroughly cooled before use.

The base can be stored on the tin base for later use if needed – wrapped in foil or in an airtight container.

Sernik

Make your sernik (cheesecake) mixture and pour this onto the base and bake as per your recipe.

I used around 450 – 500g of yoghurt cheese with the addition of  mixed peel as in my another cheesecake recipe.


Great cake lifter from Lakeland Plastics.


Cake is on a Lead Crystal cake stand

Cake forks are Crazy Daisy by Portmeirion designed by Sophie Conran in 2009.

Tea plates are Enchantment by Colclough from the mid 1950s – 1960s.


Hazelnut – Tort

Corylus avellana is the hazelnut, also known as  cobnut or filbert nut.  In Polish it is orzech laskowy  – which translates as nut of the forest and as its name implies hazel trees or bushes grow abundantly in Poland.

Turkey is the largest commercial producer of hazelnuts followed by Italy.

Ferrero SpA  – makers of Ferrero Rocher and Nutella use 25% of the global supply of hazelnuts per annum.

Tort is a layer cake (in England the French word gateaux is used) – the layers of cake being sandwiched together with a butter cream (Sweet whipped cream was hardly known in Poland – with soured cream being the norm).

The word tort is originally from the Latin torta – flat cake or round loaf of bread.

A tort can be round or in a block shape – it often has very decorative piping  – my decorations tend to be more simple!

A tort is often made for celebrations and is often very large – I have recipes which call for a dozen or more eggs!

The following recipe only uses 6 eggs!

This tort recipe uses hazelnuts which have been roasted and then ground.

I often buy my hazelnuts from a  dried fruit & nut stall in Leeds Kirkgate Market.  This the largest covered market in Europe and was founded in 1875 and has around 100,000 visitors per week.

On this stall you can buy : whole hazel nuts, roasted hazel nuts and ground roasted hazel nuts.

I use either roasted hazel nuts and grind them myself or roast the hazel nuts myself and then grind them.

Roasting Hazel Nuts

To roast hazelnuts put the shelled nuts on a baking tray and put them in an oven at GM 5 – 190°C for around 10 to 15 minutes – keep checking as it is easy to burn them.

Once they are done, leave them to cool and then rub off the papery skins between your fingers and discard them.


I use an electric grinder which is very useful.


Ingredients

  • 6 eggs
  • 225g  caster sugar
  • 225g roasted & ground hazelnuts
  • 2 sponge fingers – crushed
  • Method

Pre-heat the oven to GM5 – 190°C

Grease and line a 23cm x 32cm baking tray.


Mix together the ground hazelnuts and crushed sponge fingers.


Whisk together the eggs and caster sugar until they are pale and fluffy.


Fold in the nut mixture.

Pour the mixture onto the baking tray and bake for  around 20 minutes until it is golden on top.


Take out and leave it to cool on a cooling tray.

Measure the length of the cake and cut it into 3 equal pieces.


A poncz (sweet punch for moistening the cake) is used on each layer.

I used one made from 150ml of weak black tea, 45 ml of rum and 2 tablespoons of granulated sugar.

Rum Butter Cream

Ingredients

  • 120g butter
  • 2 egg yolks
  • 2 tablespoons of rum
  • 300g icing sugar ( approximate amount)
  • Method

Cream together the butter and egg yolks.

Add the rum and cream again.

Mix in the icing sugar till you have a smooth butter cream


Using a spatulas layer up the cake first with poncz on each layer and then the butter cream.

Cover the top and sides with the butter cream.

Make fancy patterns with spatulas (or you can do fancy piping if you wish).


Little spatulas for decorating with icing.


Tea plates are Silver Rose by Duchess from the 1950s & 1960s.

The cake slice is Water Garden by Portmeirion.

Round Tort

The same quantities and method as above can be used for two 18m diameter cake tins.

Here the poncz was made from 150ml weak black tea and 2 tablespoons of granulated sugar & coffee butter cream was used.

Coffee Butter Cream

Ingredients

90g butter

1 egg yolk

3 tablespoons of very strong coffee

250g of icing sugar (approximate amount)


Method

Cream the butter and egg yolk.

Add the coffee and cream again.

Mix in the icing sugar until you have a thick butter cream.


Use the poncz to moisten the cake & layer up and coat with the icing.

20170730_182946


Very useful cake lifter – from Lakeland Plastics – for moving the cake

20170604_065017


Another cake lifter


Tea set is by Spencer Stevenson Co Ltd, who manufactured in England  between 1948 and 1960.  The design name is not known.

Green Teapot is Café Culture by Maxwell Williams.

Other Cake Sizes

3 eggs with 110g of roasted hazel nuts & 110g of caster sugar for 1 – 18cm diameter cake tin.

4 eggs with 150g of roasted hazelnuts & 150g of caster sugar for 1  – 22cm diameter cake tin.