Biszkopt is a fat free sponge cake which means it does not have any butter, margarine or oil in it – just eggs, sugar & flour.
This recipe in my Polish cookery book is described as oszczędna which means economical and compared with many of the recipes which use 4 or more eggs it is.
I used this recipe to make a cake which is very popular in Poland – rolada which is a roulade or roll.
I was really pleased with this recipe & think I will continue to use this the most.
Ingredients
40g potato flour
3 tablespoons of plain flour
1 teaspoon baking powder.
2 eggs separated
65g icing sugar plus 1 tablespoon of icing sugar & extra for dusting.
2 tablespoons of boiling water
Also you need a tin 23 x 32cms & 3 sheets of greaseproof paper
Fillings
Jam
Lemon Curd – This is very English but I am sure it would be loved in Poland –
Marks & Spencer’s Sicilian lemon curd is superb!
Butter Cream filling of your choice – I used coffee & rum here.
Method
Pre-heat oven to GM 4 – 180°C
There are lots of steps in this recipe & after several trials, I have given the steps in the order I found worked the best.
Grease and line a 23 x 32cms baking tin – you can also grease the paper on the upper side – I have found this does make it easier to remove the cake.
Mix together the potato flour, plain flour and the baking powder.
Whisk the egg whites until they are stiff then add in 1 tablespoon of icing sugar and whisk again.
Whisk the egg yolks until they are pale then add the 2 tablespoons of boiling water and whisk again, add the icing sugar and whisk till the mixture is pale and creamy.
Gently fold in the flour mixture.
Fold in the stiff whites.
Pour the mixture into the baking pan & bake for around 15 minutes or until golden brown.
Remove from the oven and lightly dust with icing sugar then turn this out onto a sheet of greaseproof paper also dusted with icing sugar.
Place another piece of greaseproof on top of this and roll up the cake (starting with a short side) with the paper.
Leave this to cool.
Unroll the cake and spread with jam, lemon curd or a butter cream filling of your choice & then roll up the cake again.
Dust the cake with icing sugar.
Rolada with lemon curd
Blue edged plates 1930s Allertons Ltd
Sandwich plate H&K Tunstall
Rolada with jam
Coffee & Rum Butter Cream
Ingredients
2 egg yolks
100g icing sugar
120g of butter
2 tablespoons of strong coffee
2 tablespoons of rum
Method
Make some strong coffee using 20g of ground coffee and boiling water and then strain it and leave to cool.
(You can of course use instant coffee – my mother used Camp coffee years ago & it is still available)
Beat the egg yolks, butter & icing together
Add the coffee & rum and mix well in.
You can add a little more icing sugar if you think the mixture is too soft.
Biszkopt is a fat free sponge cake which means it does not have any butter, margarine or oil in it – just eggs, sugar & flour.
The word originates from the old Italian biscotto & Medieval Latin bis coctus – which means twice baked – though why I do not understand as this sponge is only baked once!
The English word biscuit also has this origin.
This sponge is used to make tort – layer cake 0r gateaux – however as these are usually such large cakes – I have used it for another popular cake in Poland – rolada – which is a roulade – often called a Swiss roll – though I have not been able to find the reason for this Swiss connection.
Rolada
Ingredients
4 eggs – separated
4 tablespoons of granulated sugar
4 tablespoons of plain flour
Icing sugar to dust
You will need 3 sheets of greaseproof paper
Fillings
Jam
Butter Cream Icing
Lemon Curd – this is very English – but would be loved in Poland – Marks & Spencer’s Sicilian lemon curd is superb!
Method
Pre-heat the oven to GM 4 – 180°C.
Grease and line a 23 x 32cms baking tin – you can also grease the paper on the upper side – I have found this does make it easier to remove the cake.
Whisk the egg whites until they are stiff.
Whisk together the egg yolks & sugar until they are pale and fluffy.
Fold in the flour.
Fold in the egg whites.
Pour the mixture into the baking pan & bake for around 15 minutes or until golden brown.
Remove from the oven and lightly dust with icing sugar then turn this out onto a sheet of greaseproof paper also dusted with icing sugar.
Place another piece of greaseproof on top of this and roll up the cake (starting with a short side) with the paper.
Leave this to cool.
Unroll the cake and spread with jam, lemon curd or a butter cream filling of your choice & then roll up the cake again.
After apples (see It’s Only A Bird!) one of the most popular ways of serving roast duck in Poland is with sour cherries.
Sour cherries & sweet cherries are related but in Polish they have have completely different names
Prunus cerasus are wiśnie – sour cherries also known as morello cherries & Prunus avium are czereśnie – sweet cherries.
Prunus cerasus originated in the Iranian plateau & Eastern Europe.
Annual crop production figures for sour cherries in 2012 show:
1 – Turkey with over 187,000 tonnes
2 – Russia with over 183,000 tonnes &
3 – Poland with over 175,000 tonnes
So the figure for Poland is high when you think of the size of the top two countries, especially when figures for the whole of the United States of America are only around 38,000tonnes.
For this recipe fresh sour cherries would have to be cooked with some sugar but here in England rather than fresh sour cherries you have to use bottled ones.
Previously I used to be able to buy bottled sour cherries produced by Krakus or PEK but recently went out shopping for these I could not find any shops that stocked them.
In one of the Polish shops I found some from the company EDMAL and I also found some in Lidl.
Both are good though personally I preferred the taste of the EDMAL ones.
The Lidl ones are pitted whearas the EDMAL ones still have the stones in – you can remove the stones if you want or just warn people that the stones are still in.
Cherry Stoner
There is more liquid in the EDMAL jar as this is sold as a kompot.
Kompotis a non-alcoholic sweet beverage, that may be served hot or cold.
It is made by cooking fruit such as apples, rhubarb, gooseberries, or sour cherries in a large volume of water, together with sugar or raisins. Sometimes spices such cinnamon are added for additional flavour, especially in winter when kompot is usually served hot.
For this recipe you need to strain more liquid off from the kompot which you can save and drink later.
A jar is easily enough for 4 people and could serve 6.
The sour cherries are cooked separately from the duck in this recipe.
Rather than using whole duck, I use duck breasts, 1 per person, as this makes it easier for me especially when there are more than two people for dinner.
I am giving instructions for 2 different coatings for the duck here – the rest of the instructions are the same.
Ingredients
Duck breasts – 1 per person
Jar of sour cherries.
Italian herbs or ground allspice
Salt & pepper
Method
Rub the duck breasts with Italian herbs, ground black pepper and salt and leave for at least an hour.
or
Rub the duck breasts with allspice and salt and leave for at least an hour
Duck breast with Italian herbs, salt and pepper.
Duck breast with allspice and salt.
Allspice is very popular in Polish cooking. It is the dried berry of the plant Pimenta diocia
Allspice in Polish is ziele angielskie which translates asherb English because it came to Poland from English traders who brought it from the West Indies in the 16th century. I do not know why it is called herb (which indicates the green part of a plant) as the word more often used for spice in Polish is zioła (indicating dried berries or roots etc).
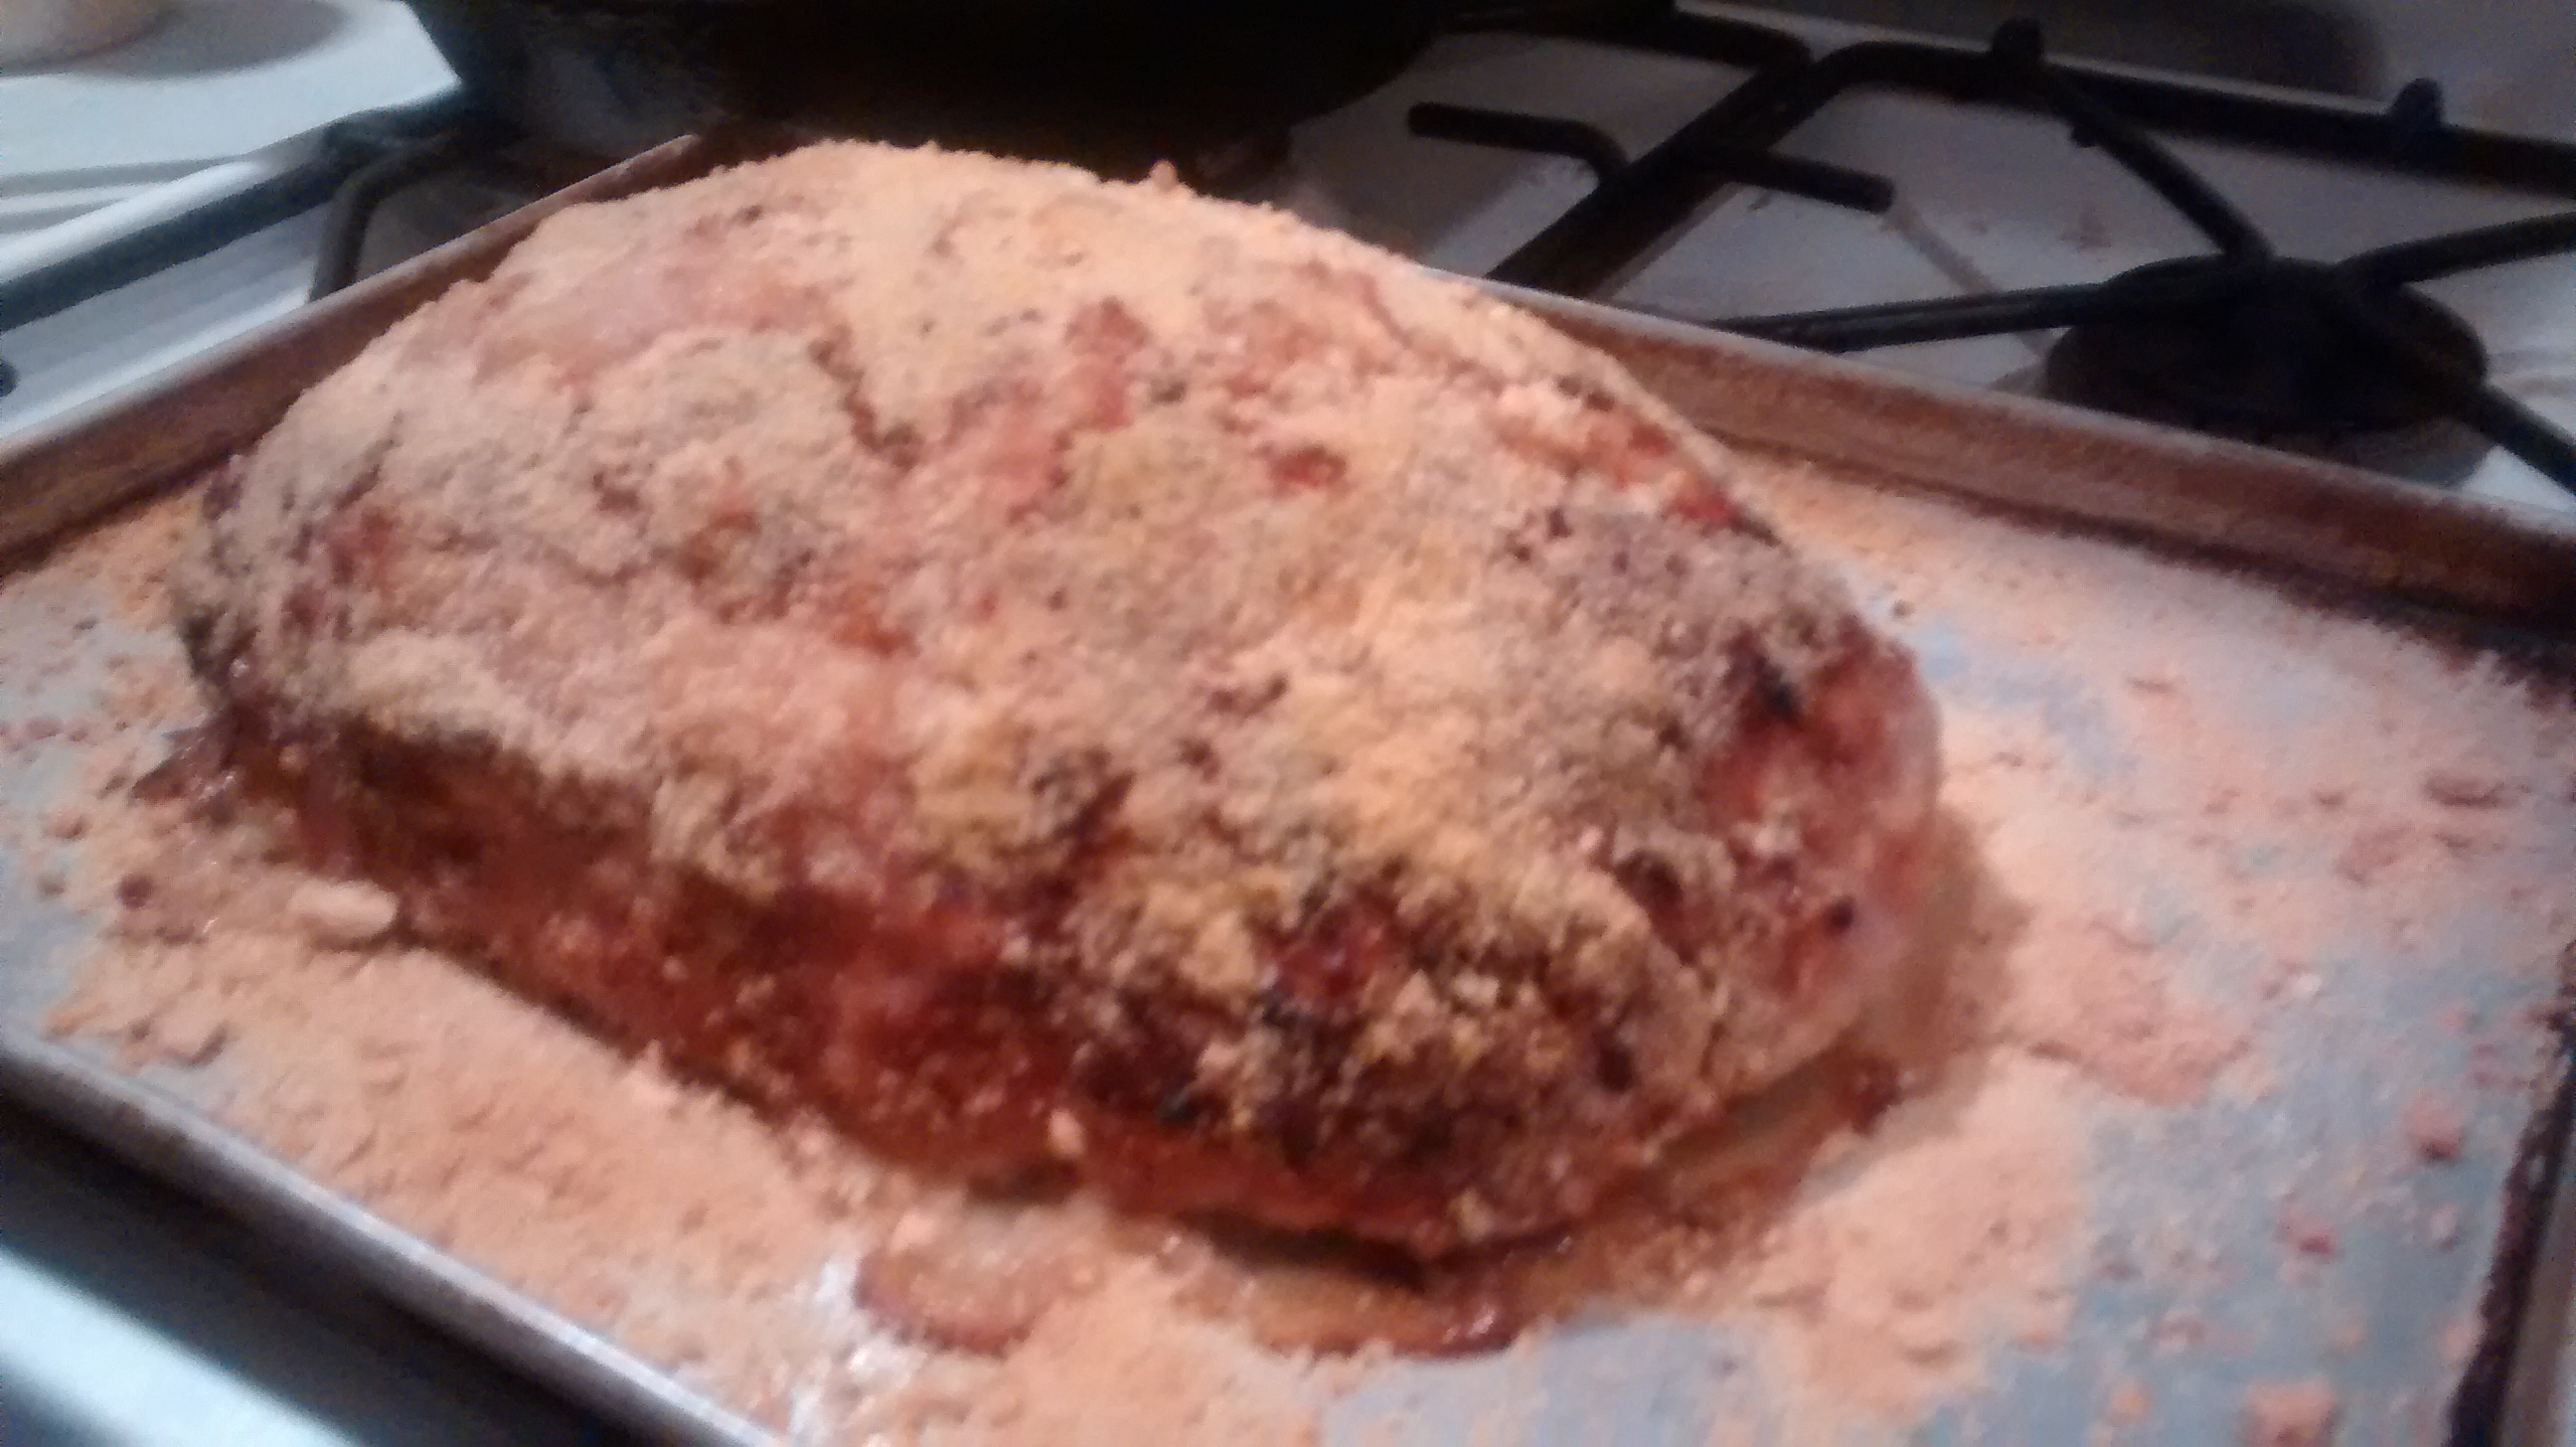
Pre-heat the oven to GM4 – 180°C
Put a baking tray in the oven for around 10 minutes to heat up.
Heat a heavy based frying pan (I use a cast iron pan) until it is very hot – you do not need any added oil or fat.
Place the duck breasts in the pan skin side down and turn the heat down to medium and cook for 2 minutes. Turn them over and cook for a further 2 minutes.
Put the duck onto the heated baking tray.
Bake in the oven for around 15 minutes.
You can serve the duck breast as whole pieces or slice them up.
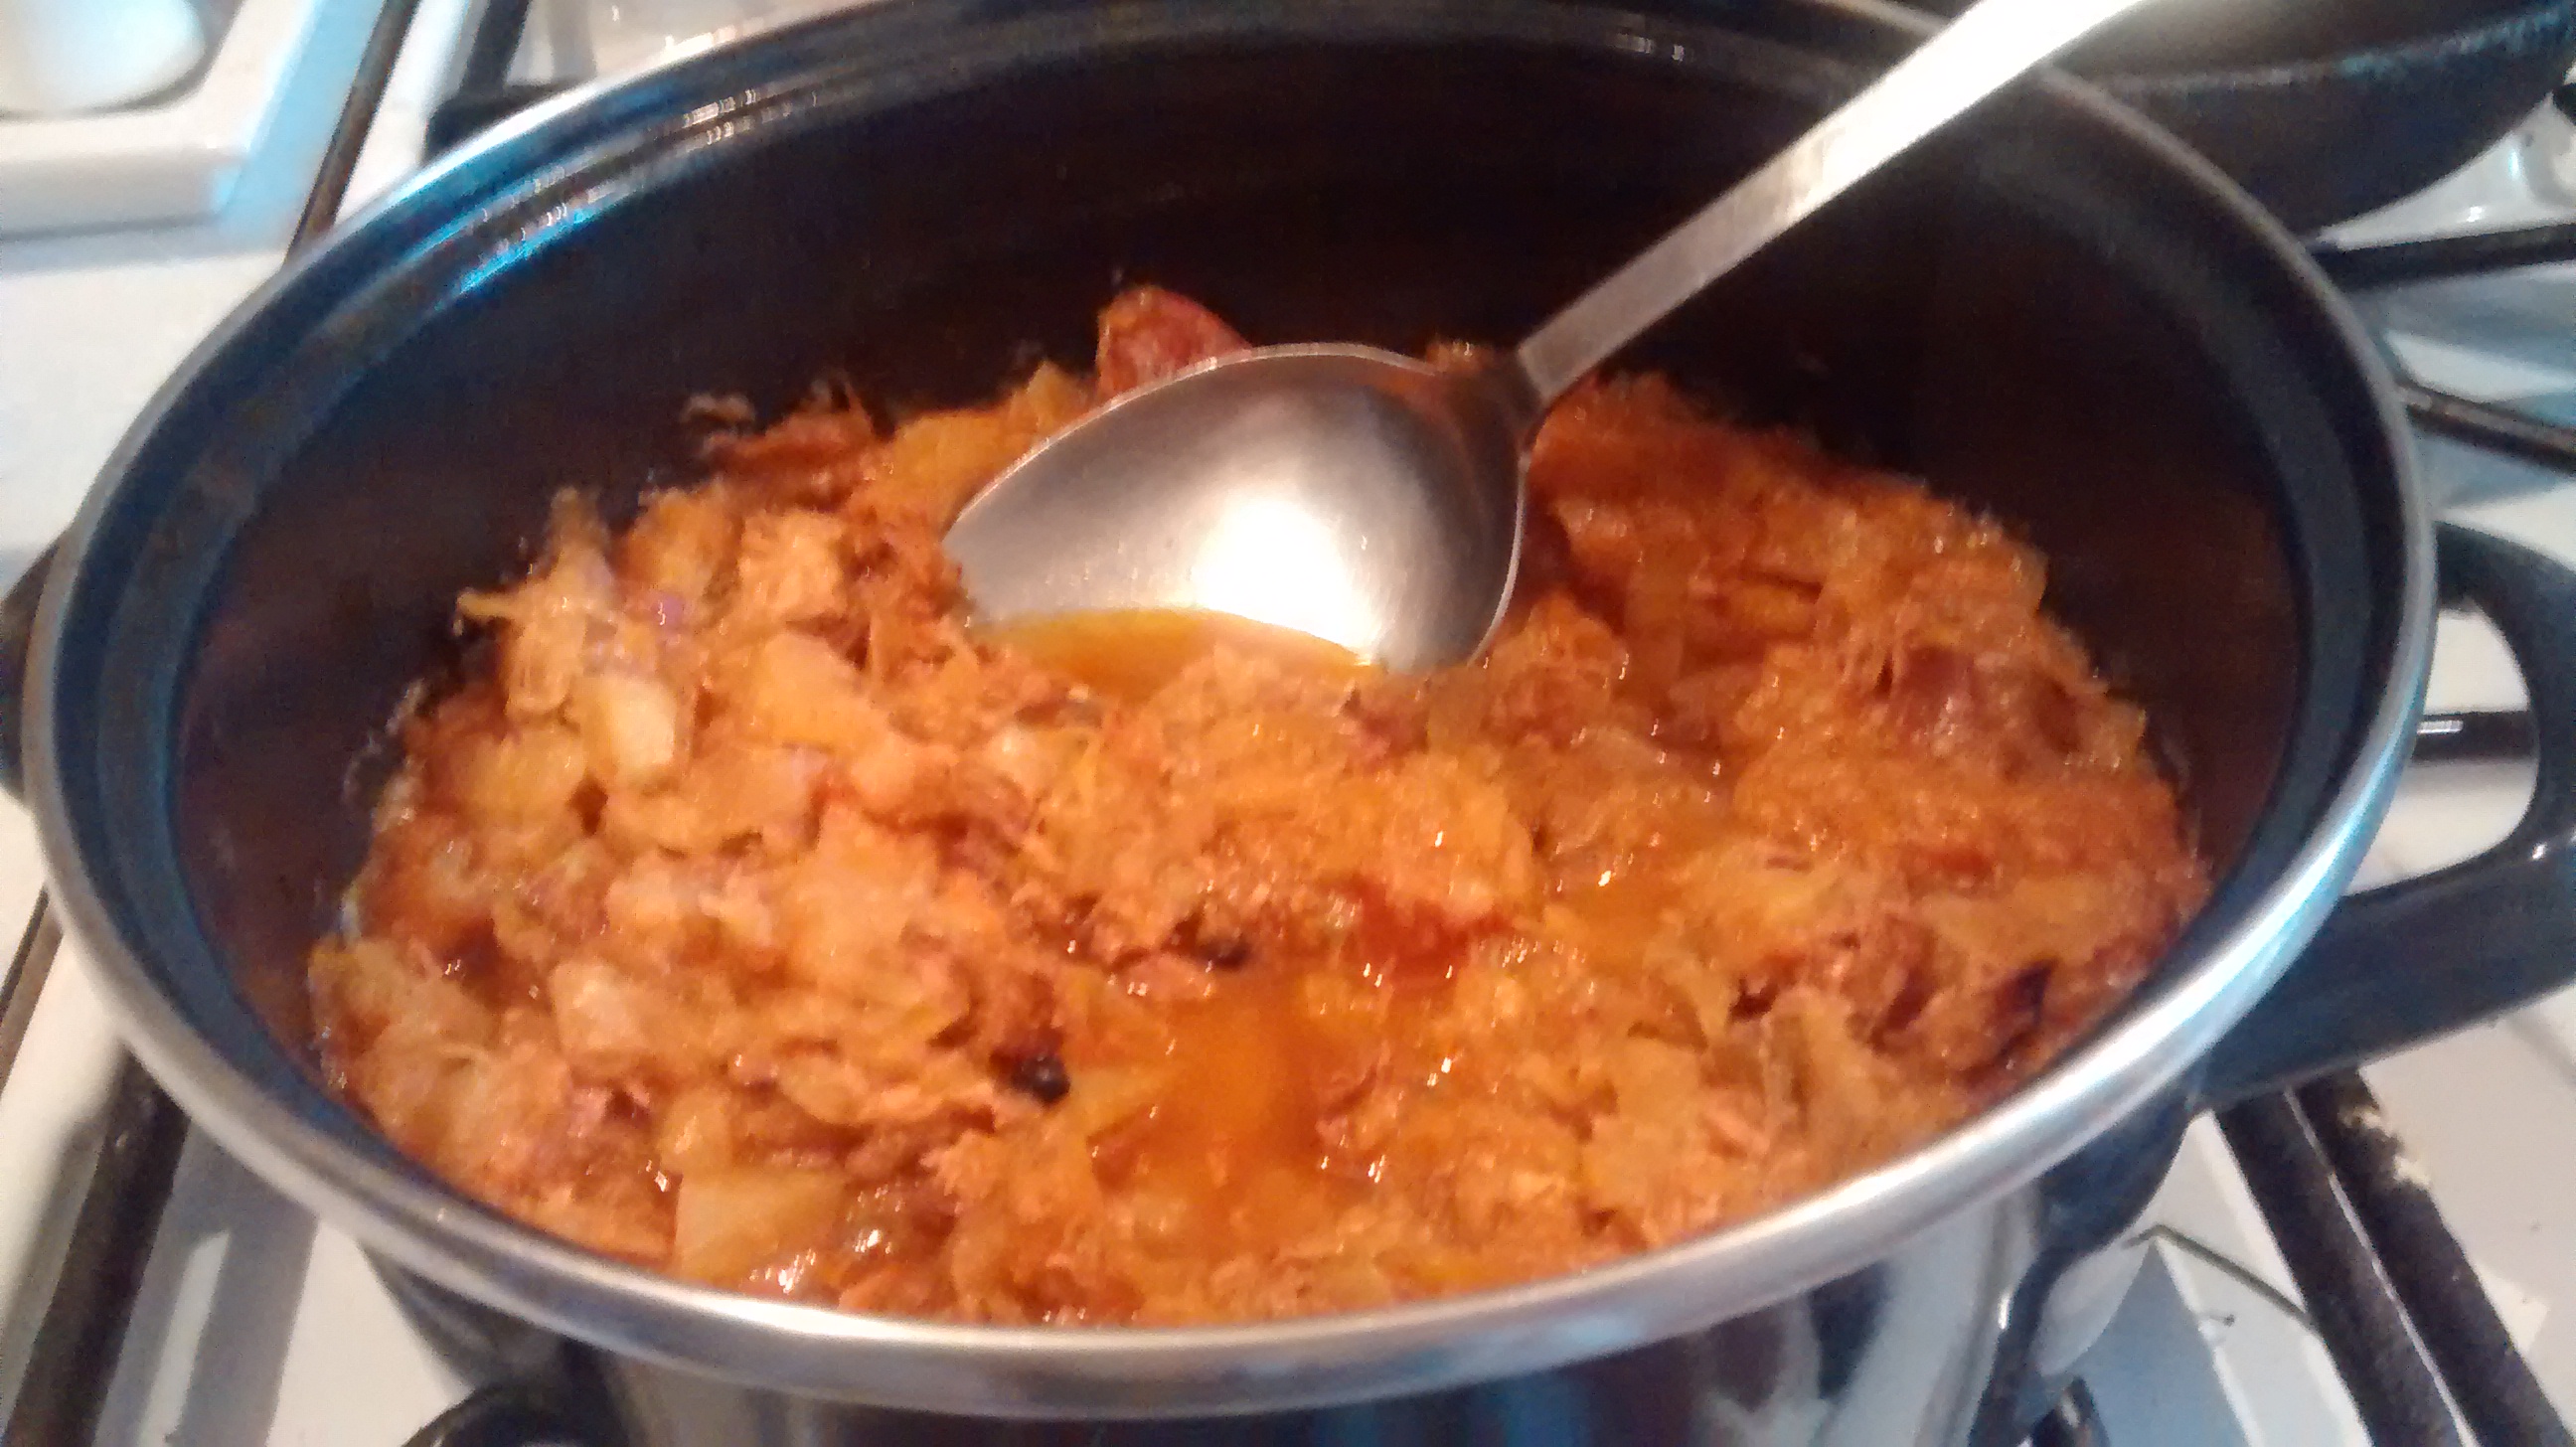
Whilst the duck is in the oven, put the strained cherries with some of the juice into a pan and bring to the boil, then simmer gently for around 5 minutes – do not let them boil dry – add extra juice if necessary.
Serve the cooked duck with the cherries, adding some of the juices as well as the fruit.
Duck with sour cherries served on Carnation (1982 -1998) by Royal Doulton
To understand a Polish Christmas one has to know about its historical and cultural background as these have shaped what we have today.
Poles love festivals and traditions and there seem to me to be more celebrations in Poland than in England with every possible Saint’s day or other opportunity for a gathering, with eating and drinking, taken.
Polish Recipe Books For Christmas
History & Background
In the first centuries AD, around the river Warta, between the river Odra (Oder) and the river Wisła (Vistula) was the cradle of Poland. (The Wisła runs from the Carpathian Mountains to the Baltic Sea.) This region was immense forest land but many areas along the rivers had been cleared. In the east of Poland there are still the remains of the primeval forest at Białowierza (White Tower), this is a National Park were bison and wild boar roam.
By the 5th century the “Amber Road” was the trade route from the Baltic in the North to the Mediterranean in the South.
In the 6th & 7th centuries, many different Slav tribes arrived there, and as by now more of the land had been cleared, they settled.
The People of the Fields
By the mid 10th centurythe Polanie tribe became dominant – these were the people of the fields – pole means fields in Polish.
Agriculture in General
Compared to England the summers are warmer and the winters much colder, a drier cold than in England, often up to -300 C, with lots of snow.
The fertile plains of Poland have made it an agricultural country and the people are close to the land and understand about the seasons and food production. Even now in towns people have vegetable gardens & allotments.
Main crops are wheat, rye, buckwheat, potatoes and cabbage.
Dill is a favourite herb, also flat leaf parsley and caraway.
Pork is the most popular meat.
Poultry and eggs are used extensively
Butter, milk, soured milk, smetana (soured cream), twaróg (curd cheese) feature in many recipes.
In the south in the Tatra Mountains they make smoked cheeses from sheep’s milk.
In the 16th century southern Poland was 40C warmer than it is today and grapes for wine were grown.
Food from the Forest
Mushrooms, fruits and berries are even today collected from forests, eaten, preserved or even sold at the roadside.
Fish are caught in rivers and lakes, fish farms are becoming popular.
Dried mushrooms provide a lot of flavour in the winter diet.
Food Preservation for the Winter
Drying
Fermentation with Brine
Bottling
Smoking
Marinating
Jams – using sugar
Christianity in Poland
In 966 Duke Mieszko the First, Poland’s first recorded leader converted to Christianity.
By the 13th & 14th centuries Roman Catholicism was the main religion in Poland.
In the late 14th century the marriage of the Polish Queen Jadwiga to the Duke of Lithuania was on the promise of his and his people’s conversion to Christianity and the formation of a new enlarged Poland.
In the 16th century the Reformation did come to Poland and did have followers but it mostly died out following arguments between different factions & the Catholic counter reformation.
After the middle of the 17th century the main religion was again Roman Catholicism and is still so today.
Poland was more tolerant of different religions than many of its neighbours and by the early 20th century it had more Jewish people that any other country in Europe.
Advent
St Andrew’s Day – 30 November is celebrated in Poland, and the eve on 29November has many superstitions and traditions to do with foretelling the future especially with regards to future husbands.
The nearest Sunday to 30 November is the start of Advent, this can be from 27 November to 3 December so there are always 4 Sundays before Christmas day.
Advent is a time of reflection, prayer and preparation.
In the past Advent was like Lent; a time of doing without.
In Poland Christmas is celebrated from the evening of 24 December – Wigilia (the vigil) and parties and visiting relatives and family happens from then on.
It seems very strange to the Poles to have all the Christmas parties before Christmas when is still Advent.
The Christmas days are called Gody – days of Harmony and Goodwill
6 December – St Nicholas Day
Older pictures show Swięty Mikołaj (St Nicholas) in his bishop’s robes, newer ones tend to be more like the English Santa.
Presents were to be found on the doorstep or hidden in the house or under the pillow.
Pierniki – spiced honey cakes are given to children, often in the shape of the bishop.
He returns again on Christmas Eve after the evening meal.
It used to be that presents were given on just one of these days, usually 6 December and Christmas Eve was more about the meal and carols and Church.
Nowadays you are likely to get presents on both days.
Before the Second World War the presents were small tokens such as mandarin oranges (a luxury – as they were imported), chocolates, and an item of new clothes or a small toy.
Christmas Tree
The old Polish Tradition was to hang from the ceiling just the tip of a spruce/fir tree (tip side down) decorated with apples and nuts which were either wrapped in silver or gold paper or painted and ribbons. Old Polish Village houses are made of wood – so it was easy to attach the tree tip.
Doorways and walls were often decorated with separate boughs of the remainder of the tree.
This custom originated in pre-Christian times and texts dating back to the 15th & 16th centuries referred to this use of the tree as a pagan rite. Unable to halt the growing trend, the church then reinterpreted the tree to be the Tree of Knowledge – the tree of good and evil.
The tradition of using the whole tree came from Germany in the late 18th century and early 19th century first into the towns and then into richer villages and by the 1920s this had taken over.
In small flats and in towns, and with small funds, people often still just decorate a branch of a fir tree.
Decorations for the tree
Apples symbolise health & beauty, strength & vitality and paradise
Nuts wrapped in Silver or Gold guarantee prosperity & vitality.
When I was young we tied wrapped sweets & chocolates on the tree.
The Tree is put up on Christmas Eve (though nowadays maybe a day or 2 before) the whole family helps.
Decorated with glass baubles – in the past these were often blown eggs decorated with glitter. There are also many straw decorations – angels and stars.
Many of the old ornaments look like the apples and nuts of before.
Some of my mother’s old nut baubles with a few newer ones
Recent Magazine Feature
Nowadays Polish Glass Factories make 2,500 glass baubles a day, some of them very elaborate and expensive.
Paper chains guarantee love within the family.
Candles and baubles guard the house from malevolent deeds.
The star on the top of the tree helps guide back absent family and friend
Bells symbolise good news
Angels are the guardians of the house.
Clip on candles holders with real candles though nowadays artificial lights are more likely to be used.
Photograph’s of my mother’s clip in candle holders.
Pierniki – spiced honey cakes with white icing were used in some areas.
Polish Cribs – szopka
Cribs are varied in Poland, mostly wooden and carved, often with the shepherds dressed in traditional Polish highland costume.
Every year In Krakow in the Grand Square (Rynek Glówny) there is a competition held on the morning of the first Thursday of December, of Christmas cribs.
Model makers come carrying their cribs and they are judged. The winners are kept in the Museum of Ethnography – the rest are sold.
I saw an exhibition of past winners when they were on tour in England in 2011 at The Lowry in Salford.
This competition began in 1937. It was intended to bring back to life a tradition which had died shortly after the First World War, that of the Crib Theatre and these cribs are portable theatres for traditional puppet Nativity plays.
These ornate cribs are very colourful and richly decorated. They are covered in coloured foils, and are inspired by the architecture of Krakow eg Wawel Cathedral and the unequal spires of The Church of the Virgin Mary – Mariatski
They can be from 15 cm high up to 2 metres high and some have clockwork mechanisms or lights.
In the past the Christmas cribs were mostly the works of Krakow masons in their idle weeks of the Polish rainy late autumn.
Nowadays it is a pastime of many Krakow dwellers of all walks of life. And the city boasts several dynasties of Christmas crib makers where two or three generations construct brand-new cribs every year.
Christmas cards
In the past these were always postcards but now folded cards are coming in to vogue.
Copies of old cards from Zakopane from the 1930s – bought in the Folk Museum there.
From an Old Christmas Card from the 1930s
Cards are only sent to family and friends that will not been seen over Christmas.
In Communist times cards depicted, branches of fir trees and baubles, nowadays many religious cards are sent.
A Polish Christmas Card
Often when Poles send cards to family abroad they include a piece opłatek. This was originally bread but now a paper thin wafer with an impression of the Nativity scene is used and is a symbol of forgiveness, unity and love.
The opłatek usually has the corner nipped off to show that this is being shared. My aunty in America always does this.
This is a very Important Meal – Poles want to be with their family on this evening.
This Christmas Eve supper became a fixed tradition in Poland in the 18th century.
It is a completely unique experience with an ordinary evening meal transformed into a celebration of family love and solidarity and it is also so strange that in a country of meat lovers this meatless meal is so important and loved.
The days before the meal were a time to thoroughly clean the house.
The day used to be a day Fasting & Abstinence as the last day of Advent – no meat on that day (abstinence) and only 1 main/large meal (fasting)
There are usually 12 dishes for the 12 apostles though some areas have an odd number of dishes either 7, 9 or 11.
I only make dishes which would have been available through food preservation in the winter or are seasonal.
Presents
If there are presents they are placed under the tree and opened at the end of the meal.
In some areas of the West of Poland– presents today come from Gwiazdor – Starman
In the South West of Poland from an angel or baby Jesus.
In Communist times to try and remove the religious idea – many tried to favour Gwiazdor often portrayed in red robes with gold star or even to introduce the Russian Grandfather Frost on January 1st – unsuccessfully.
However Gwiazdor had links with St Nicholas (Swięty Mikołaj) as he often carries a star in front of St Nicholas.
Carols
The oldest hymn/carol in the Polish Language is Bogurodzica (Mother of God) and is known from the beginning of the 13th Century.
Carols are rich and varied with examples from many different centuries with ones originating from:
church music
to many with music from the Royal Court such as the Polonaise
to lively folk & dance music &
quiet lullabies.
Many carols feature shepherds as the Poles from the countryside felt an empathy with them.
Bóg się Rodzi – a Polonaise( Polonez )– words from the 18th Century.
Przebieżeli do Betlejem – music from the 16th Century.
Carols are sung from midnight mass till 2nd February in Church.
Carollers went from the second day of the Holiday – 26 December until 6 January – carrying:
a star,
a crib,
a stork – the New Year – new life
a baby goat – fertility
a bear – hostile forces of Nature
In some areas Carollers went from Christmas Eve – after their own meal.
They are welcome visitors however if your house is left out then this is seen as a sign of bad luck.
Food for Christmas Day
Many would say that this meal is just like a very special Sunday Dinner.
There are not as many must have dishes on Christmas Day
As with all Polish dinners there is soup to start and this would be most likely rosol – clear chicken consommé with small pasta pieces (the original chicken noodle soup)
There will be lots of MEAT with Pork Dishes mainly such as:
Tort – rich layer cake often made from hazel nuts.
Nowadays there will also there will be chocolates & these Polish dried plums with chocolate continue the tradition of dried fruits at Christmas time – I love them!
My China & Tableware – A New Tradition
Classic white china would be the norm for Christmas but over the last couple of years I have started to use china with poppies* and other red flowers at Christmas time as well as china with autumn and winter foliage from my collection of china.
*Although not a Christmas flower – these poppies are a remembrance to the Battle at Monte Cassino in May 1944 & the military song – Czerwone maki na Monte Cassino – Red poppies on Monte Cassino. As my father fought there, these are very special for me.
New Year’s Eve – Sylwestra
31 December is the feast of Saint Sylwester (Sylvester) and this is the name of the festival in Polish.
In the towns & cities the evening is often celebrated with a dance – no special traditional dishes – more of the Christmas Day type food.
Sleigh rides from house to house, with food at each, were popular in times gone by on the eve and on New Year’s Day.
The 3 Kings – 6 January – Epiphany
During the Christmas period the priest would visit all the homes of his parishioners and say prayers, bless the house and get an offering. He would also bless some chalk or blessed chalk would be obtained at the Mass on 6 January. This chalk is used on 6 January to write over the door frame in the house –
For example for next year – 2017
20+ K + M + B + 17
For the year and Kasper, Melchior and Baltazar – the traditional names of the kings.
To bless all who enter or leave in the coming year.
The end of the Christmas period
In the church – 2 February – Candlemas day – 40 days after Christmas – is the official end of Christmas and then karnawał starts – the festive time before Lent.
I was in Poland during a time of economic difficulties when there were food shortages & rationing. It was in the summer holiday period,
In order to alleviate the meat shortage in the main tourist areas, hotels & restaurants had been all allocated a different Meatless Day each week.
Now in Poland when you say meat – most people think pork!
I had not really been affected by this as most of my time had been spent with relatives and much of it in the countryside but I did make one visit to Warsaw and went with my cousin to a small but posh restaurant.
Warszawa
Warszawa
Warszawa
Warzawa
Warszawa
Warszawa
The maître d’ came up to me and this was the conversation:
“My dear lady, I am afraid you have come to us on a meatless day”
“Please do not worry, what do you have on the menu?”
“There is roast duck”
“Is duck not meat?”
“It’s only a bird!”
On that day I had the best roast duck with apples I have ever eaten!
I have spent some time recreating this dish. The duck I had in Warsaw had been roasted stuffed with apples – here I have been using duck breast fillets as this fits in better with the meals I make.
I have tried using eating apples & cooking apples and they have both turned out very well. The recipe with cooking apples is nearer to the original Polish roast but as they were both delicious I am including them both.
For these recipes I have used Gressingham duck breasts.
Gressingham duck was first breed in Lancashire, England in the 1980s near a village of that name. It is cross between the small flavourful wild Mallard and the larger Pekin duck. It gives a succulent duck with more breast meat, less fat and a rich, gamey flavour.
Production is now by Gressingham Foods Ltd in East Anglia.
I have used the same method for preparing and cooking the duck breasts, allowing 1 breast per person. The difference between the 2 recipes is the type of apple used.
Duck with Bramley Apples
Ingredients
1 Duck breast per person
2 to 3 Bramley apples
1 tablespoon of butter
1 tablespoon of sugar
Italian Herbs
Salt & Pepper
Method
Rub the duck breasts with Italian herbs, ground black pepper and salt and leave for at least 1 hour.
Pre-heat the oven to GM 4 – 180°C.
Peel and core the Bramley and cut into quarters or eighths depending on the size of the apples.
In a saucepan, over a low heat, melt the butter, add the apples and cook then for around 5 minutes – you want them to to be softened but not a purée. Keep them warm in the pan whilst you do the duck breasts.
Heat a heavy based frying pan (I use a cast iron pan) until it is very hot- you do not need any added oil or fat.
Place the duck breasts in the pan skin side down and turn the heat down to medium and cook for 2 minutes. Turn them over and cook for a further 2 minutes.
Put the apples onto a baking tray and sprinkle a tablespoon of sugar over them.
Put the duck breast on top of the apples with the skin side up.
Bake in the oven for around 15 minutes.
Duck with Eating Apples
Ingredients
1 Duck breasts per person
2 to 3 eating apples such as Pink Lady or Jazz
1 tablespoon of butter
Italian Herbs
Salt & Pepper
Method
Rub the duck breasts with Italian herbs, ground black pepper and salt and leave for at least 1 hour.
Pre- heat the oven to GM 4 – 180°C.
Leave the skins on the eating apples.
Core the apples and cut them into thick slices.
In a saucepan, over a low heat, melt the butter,add the apples and cook then for around 5 minutes – you want them to to be softened but not a purée. Keep them warm in the pan whilst you do the duck breasts.
Heat a heavy based frying pan (I use a cast iron pan) until it is very hot- you do not need any added oil or fat.
Place the duck breasts in the pan skin side down and turn the heat down to medium and cook for 2 minutes. Turn them over and cook for a further 2 minutes.
Put the apples onto a baking tray.
Put the duck breast on top of the apples with the skin side up.
The Polish word pulpety comes from the Italian word polpette & that word come from polpa meaning pulp.
The word polpette has been used in Italy since the 15th century – though of course meatballs in many forms are to been found in most cultures & countries and are a way of using every last piece of carcass.
Pulpety in Poland are made from meat or fish – I am just going to cover meat in this post.
Meat pulpety can be made from fresh meat or from cooked meat. I prefer the fresh meat ones and if I have any roast meat leftovers I am more likely to use them up in other ways such as in Pierogi – Polish Filled Pasta fillings.
The difference being that pulpety are very small and they are boiled/simmered not fried.
They are often used as an accompaniment for soup – with around 4 to 6 being added to a serving of soup. (There will be much more on the topic of soup in the future.)
Pulpety can be simmered in water or stock – I always uses stock – either chicken or vegetable.
Meat pulpety
Ingredients
400g of minced beef or pork or a mixture of the two
1 onion
1 slice of white bread or bread roll, left for half an hour in a bowl with a little milk – do not use the excess milk just the wet slightly squeezed bread.
Stock / bullion – chicken or vegetable – can be from a stock cube.
Method
Grate the onion on a fine grated or use an electric mini-chopper.
In a large bowl mix all the ingredients together except for the dried breadcrumbs, it is best to do this using both hands, making sure that all the ingredients are thoroughly combined.
Add enough dried breadcrumbs so that it is a firm mixture.
Put some flour in a dish for your hands to make it easier to shape the pulpety.
Pinch off small bits of the meat mixture and roll the piece between your hands to make small round balls and place these onto a floured board or tray whilst you make them all.
You can leave these to chill in a cool place or in the fridge if you have time.
In a large pan heat up some stock and drop the pulpety into the boiling liquid and then let them simmer for around 5 minutes.
Remove them from the liquid with a slotted spoon.
Polish style would be to have around 5 pulpety in a bowl of soup – but often I do these for a light lunch and have a large bowl of soup with lots of pulpety per serving.
In the photograph below, they were served in a tomato soup.
Served In A Sauce
The varieties here are endless – make one of your favourite sauces for example mushroom or tomato and drop the cooked pulpety into the sauce and let them simmer.
You can then serve them with potatoes, pasta, rice or to be very Polish – buckwheat.
I was looking for some salad recipes for red cabbage and came across these three in my Polish recipe books.
Two different methods are used to prepare the cabbage and I was intrigued to see how they would turn out. They were both a success and I will be using them again.
Red Cabbage Salad 1
This method is in between using raw and cooked cabbage.
Ingredients
½ head of red cabbage
1 large Bramley Apple
Juice of 2 lemons
1 small onion
2 tablespoons of olive oil
Salt & pepper to taste
1- 2 teaspoon of sugar
Method
Using a sharp knife shred the cabbage into fine slices.
Put the shredded cabbage into a pan and just cover with water, bring this to the boil and then let it simmer for 1 to 2 minutes – no more.
Strain the cabbage from the water, pour the juice of a lemon over the cabbage and mix it in, as well as taste, this will give the cabbage a lovely colour, and leave it to cool.
Chop the cabbage into small pieces.
Note – next time I will chop into much smaller pieces.
Peel and coarse grate the apple and add this to the cabbage.
Chop the onion into fine pieces and add this to the cabbage.
Mix in the juice of another lemon and 2 tablespoons of olive oil.
Add salt & pepper and sugar to taste.
This salad goes well with roast pork, goose or duck.
Red Cabbage Salad 2 & 3
For these the cabbage is grated on a coarse grater – this was quite hard to do but well worth it.
It is the dressing which makes these two salad different – both are delicious.
Red Cabbage Salad 2
Ingredients
½ head of red cabbage
1 Bramley apple
Juice of a lemon
Dressing
3 tablespoons of mayonnaise
3 tablespoons of soured cream
1 tablespoon of made-up mustard Polish, French or German style
Juice of half a lemon
Salt & pepper & sugar to taste
Method
Grated the cabbaged using a coarse grater
Peel and grate the apple using a coarse grater
Mix the grated cabbage and apple together.
Mix up all the ingredients for the dressing.
Add the dressing to the salad and thoroughly mix it all together.
Red Cabbage Salad 3
Ingredients
½ head of red cabbage
1 Bramley apple
50g of chopped walnuts
Dressing
3 to 4 tablespoons of olive oil
Juice of a lemon
1 tablespoon of runny honey
Salt & pepper to taste.
Method
Grated the cabbaged using a coarse grater
Peel and grate the apple using a coarse grater
Mix the grated cabbage and apple together.
Mix the ingredients for the dressing and pour this over the salad and mix it in.
Chop the walnuts into small pieces and mix them in before serving.
A Little Note About Walnuts
Walnuts (Juglans regia) are native to south-east Europe and south-west China. They are the oldest tree food known dating back to 7,000 BC.
There are accounts of their cultivation in Babylon (now Iraq) in 2,000BC.
Juglans regia means means Jupiter’s royal nut.
They are the seed of a drupe (stone fruit) – not a true Botanical nut.
In Polish walnuts are orzechy włoskie – nuts Italian – so named it is thought as they were brought to Poland by traders from Imperial Rome.
Black walnuts (Juglans nigra) are native to North America.
There is a little bit of linguistic confusion with this dish – I have noticed it in most translations for this recipe.
Kotlety is the Polish word for cutlets or chops as discussed in my last post.
Mielone means minced – so kotlety mielone are what in the USA are called meat patties or now in England as burgers.
My mother called both dishes kotlety – I would realise from the ingredients as to which dish was being prepared in the kitchen.
We had kotlety mielone once a week at home, any left would be heated up in a sauce, often mushroom, the next day.
In Poland they would have been made with minced pork but previously this was hard to get and my mother found it hard work to use a hand mincer, so she made hers with minced beef using the beef that the butcher would mince for her.
In her original recipe she would use an onion which was grated finely; this was the job that was often delegated to me! Later on she changed her recipe and would chop up the raw onion finely and fry this up lightly and let it go cold before adding it to the mince mixture. I now like this second version better, but both are good and you can even do half and half.
Nowadays I use an electric mini chopper to “grate” the onion.
I used beef in this recipe for years and then tried pork, and also half and half; I like the ones half and half the best, however I always make sure it is lean pork mince.
Ingredients
500g minced beef or pork, or 250g of each
1 beaten egg
1 slice of white bread or bread roll, left for half an hour in a bowl with a little milk – do not use the excess milk just the wet slightly squeezed bread
1 onion finely grated, or chopped and fried till golden brown and left to cool. (or half and half)
In a large bowl mix all the ingredients together except for the dried breadcrumbs, it is best to do this using both hands, making sure that all the ingredients are thoroughly combined.
If the mixture seems too wet then add a tablespoon full of dried breadcrumbs and mix this in.
Pour some dried breadcrumbs onto a large plate or board.
Try to make each one the same size, take a handful of the mixture and press it between your hands to make a flattened circle and then place this in the dried breadcrumbs and turn it over to cover both sides and edges.
Once coated place them on a tray dusted with breadcrumbs until you have used all the mixture up.
Shallow fry the kotlety in hot oil, depending on the frying pan size, you can do 3 to 4 at a time, turning them over so that both sides are done. Place them on kitchen roll on a plate or metal tray till they are all cooked – you can keep them warm in a low oven.
I usually serve them with creamy mashed potatoes or lightly buttered boiled rice.
Sometimes I add some finely chopped peppers or chillies to the mixture and serve them with boiled rice.
You can make the kotlety with minced chicken or turkey.
In Poland many people think that ones made with minced veal are the best.
Jasia’s Variations
My cousin Janina (Jasia is the diminutive) in her farm house in the Mazurian lakes in North East Poland made some kotlety mielone which had an addition to the usual recipe. Each one had a small piece of stuffing inside. The meat recipe was the same as was the method of cooking but when she was making them, she placed a little extra at the centre and this added an extra dimension to an old favourite.
The stuffing she used was one of the following:
A cube of cheese – the type which will melt like Gouda or cheddar
A chunk of pickled gherkin.
A thick slice of fried mushroom.
The Next Day
You can eat any kotlety you have left, cold with mustard and any salad.
However if I have any kotlety left, I often re-heated them in a sauce in the oven, my favourite is mushroom sauce.
I often just make a very quick sauce by frying up some sliced mushrooms in a little butter, adding some stock (mushroom or chicken – made from a stock cube). Add the kotlety into the pan and heat them through in the oven for around 1 hour.
Add some soured cream mixed with a tablespoon of corn flour and out this back in the oven for a while or continue heating it on a top burner.
Super served with creamy mashed potatoes – sprinkle chopped dill or parsley over them before serving.
Served on Carnation (1982 – 1998) by Royal Doulton.
The word kotlety(plural) come from the Italian word cotoletta(singular) for cutlet or chop.
Kotlety are made from pork loin or porkchops and the meat is beaten thin, dipped in beaten egg, coated in dried breadcrumbs and quickly shallow fried in oil
They can also be called bitki – which means something that is beaten or kotlety panierowane – which means coated in breadcrumbs.
Coteletta alla Milanesie is veal coated in breadcrumbs and is thought to be the inspiration for Wiener Schnitzel.
I do not know if the dish arrived in Poland from Italy or Austria however for many this is thought of as a very Polish dish. I have had this served in every Polish home I have visited and it is usually on most Polish restaurant menus.
My mother used to make them with either pork chops or pork loin if it was available. Nowadays pork loin is readily available and that is what I use.
Ingredients
Thin slices of pork loin – around 2 pieces per person
Beaten egg – 1 tends to be enough for up to 3 to 4 people
Dried breadcrumbs – home made – look for bułka tarta in a Polish shop
Sunflower oil for frying
Method
Trim the fat from the meat.
Use a metal or wooden kitchen mallet – (I find the wooden ones with very spiky heads are a bit too rough.) to beat the meat slices, turning them over to do both sides.
Have the beaten egg in a shallow dish and dip in a slice or two meat at a time.
Have the breadcrumbs on a large plate and dip the egg coated slices in the breadcrumbs, turning them over to cover both sides.
I use a cast iron frying pan into which I put some sunflower oil and heat this up to a medium to highish heat.
Quickly fry the kotlety, first on one side and then turn them over to do the over side.
You do not want the oil too hot so it burns the breadcrumbs however you do not want the heat too low or the breadcrumbs will soak up too much oil and be very greasy.
I find you can do two at a time (three if they are small pieces).
You can place the cooked ones onto kitchen paper whilst you do the rest and you can also keep them in a low oven till they are all done.
I like the freshly cooked ones the best – I always choose the last ones fried!
I serve these with creamy mashed potato, cooked frozen green peas and a Polish salad such as the ones made with sauerkraut.
Sometimes I add an English style, home made apple sauce made from the Bramley apples in my garden.
Years ago one of my colleagues had a book about Eastern European cookery in which it stated that at one time the Poles were the biggest meat eaters in Europe.
I have tried to find this publication for this reference but to no avail.
I looked up figures for meat consumption in Europe per capita and figures for the early 21st century have Luxenbourg, Spain & Austria in the top three.
Surprisingly for a nation of supposed meat lovers, a common surnames is Jarosz and Jaroszewicz and other variations on this which comes from the word jarosz which means vegetarian. We had several family friends with this surname.
If you hear the word meat in Poland, then think pork, that is the nation’s favourite, be it fresh pork or changed into the wide variety of sausages and smoked meats. I think pork will always take top place in a meal at a Polish special occasion.
In communist times, I visited my mother’s sister who had a small farm and kept pigs and made her own sausages, smoking them in a special smoking unit which was in the attic of the house; they were delicious.
On a more recent trip to other relatives in a large town, I learnt that they had put in a special order for smoked sausages and meats from a lady in a nearby village when they knew I was coming and these were far superior to what was available from the shops.
In the past, cattle were mainly kept for milk, cream, butter and cheese and any beef recipes would be for dishes that require long slow cooking. In recent times dishes are appearing in restaurants and magazines which feature cuts such as sirloin steak.
Sheep were mainly kept for wool and in the mountain regions in the South of Poland for their milk for making cheese.
There are many recipes for wild boar, venison, rabbit or hare in regional cookery.
Goose, duck and chicken are often eaten – of course a village chicken is always preferred if possible.
This post is an introduction to th meat dishes that I will be posting in the future – although I have posted a few already