Rhubarb & Custard Cake

  • Today is my Blog Anniversity – I started in 2015 – Can you believe it is 10 years of Blogging?
  • Today is post 676!
  • Still lots of recipes to come in the future – lots of books to look at and lots of recipes from friends and family.
  • Today’s post is inspired by an English combination.
  • Stewed rhubarb and warm custard is often served as a pudding in England.
  • Yesterday I had coffee and cake in a local department store.
  • I tried a piece of Rhubarb & Custard cake thinking I could use this idea.
  • Sadly this cake was not as nice I imagined as I could not taste any custard and the cream was much too sweet; although the rhubarb – rather like a tart jam was good.
  • However I thought I would use this idea to make a cake using  budyń  – thick Polish custard and some cooked rhubarb as fillings.
  • The rhubarb filling has to be made in advance and needs to be cold.
  • Cook the rhubarb until it has lost all its structure – into a pulp – but without any liquid left.
  • It needs to be still a little tart to balance the sweetness of the other ingredients.
  • You need :
  • 2 Sponge cakes – ones using butter
  • Rhubarb filling 
  • Budyń 
  • Icing Sugar to dust

Ingredients

  • 8- 10 stalks of rhubarb
  • 3-4 tablespoons of granulated sugar
  • 4 tablespoons of water (more might be needed)

Method

  • Pre-heat the oven to GM2 – 150°C.
  • Chop the rhubarb into small pieces and place into a roasting tin.
  • Sprinkle with the sugar.
  • Cook for around 40 minutes.
  • Keep checking and add water if necessary.
  • Do not allow the sugar to burn.
  • Cook until the rhubarb is very soft.
  • Mix to a pulp with a fork. 
  • Leave to cool completely.

INGREDIENTS for budyń

  • 500ml milk
  • 1 tablespoon of butter
  • 2-3 tablespoons of granulated sugar
  • 3 egg yolks
  • 3 tablespoons of potato flour (or cornflour)

METHOD for budyń

  • Put 300ml of the milk, the butter and sugar into a saucepan.
  • Heat gently till the butter has melted and the sugar dissolved, stirring all the time.
  • Bring this to the boil for a few seconds and then take off the heat.
  • Blend the potato flour with the rest of the milk (200ml) and with the egg yolks.
  • Add some of the boiled mixture to this and stir well.
  • Add this mixture to the rest of  the boiled mixture and stir well.
  • Put the pan back on the heat and bring back to boiling point, stirring gently.
  • Keep at boiling for 1 minute, stirring all the time.
  • Leave to cool completely.

Ingredients for Cake

  • 4 Eggs
  • Butter
  • Caster Sugar
  • Plain flour
  • 2½ teaspoons of baking powder
  • 2-3 drops of vanilla essence

Method for Cake

  • Grease and line the base of 2 x 21.5cm  sandwich tins. – I find anodised aluminium tins are the best. (my old tins say 8 1/2 inch on the base – 21cm or 22cm would be OK)
  • Pre-heat the oven to GM 4 – 180°c
  • The first thing you have to do is weigh your eggs – complete with their shells.
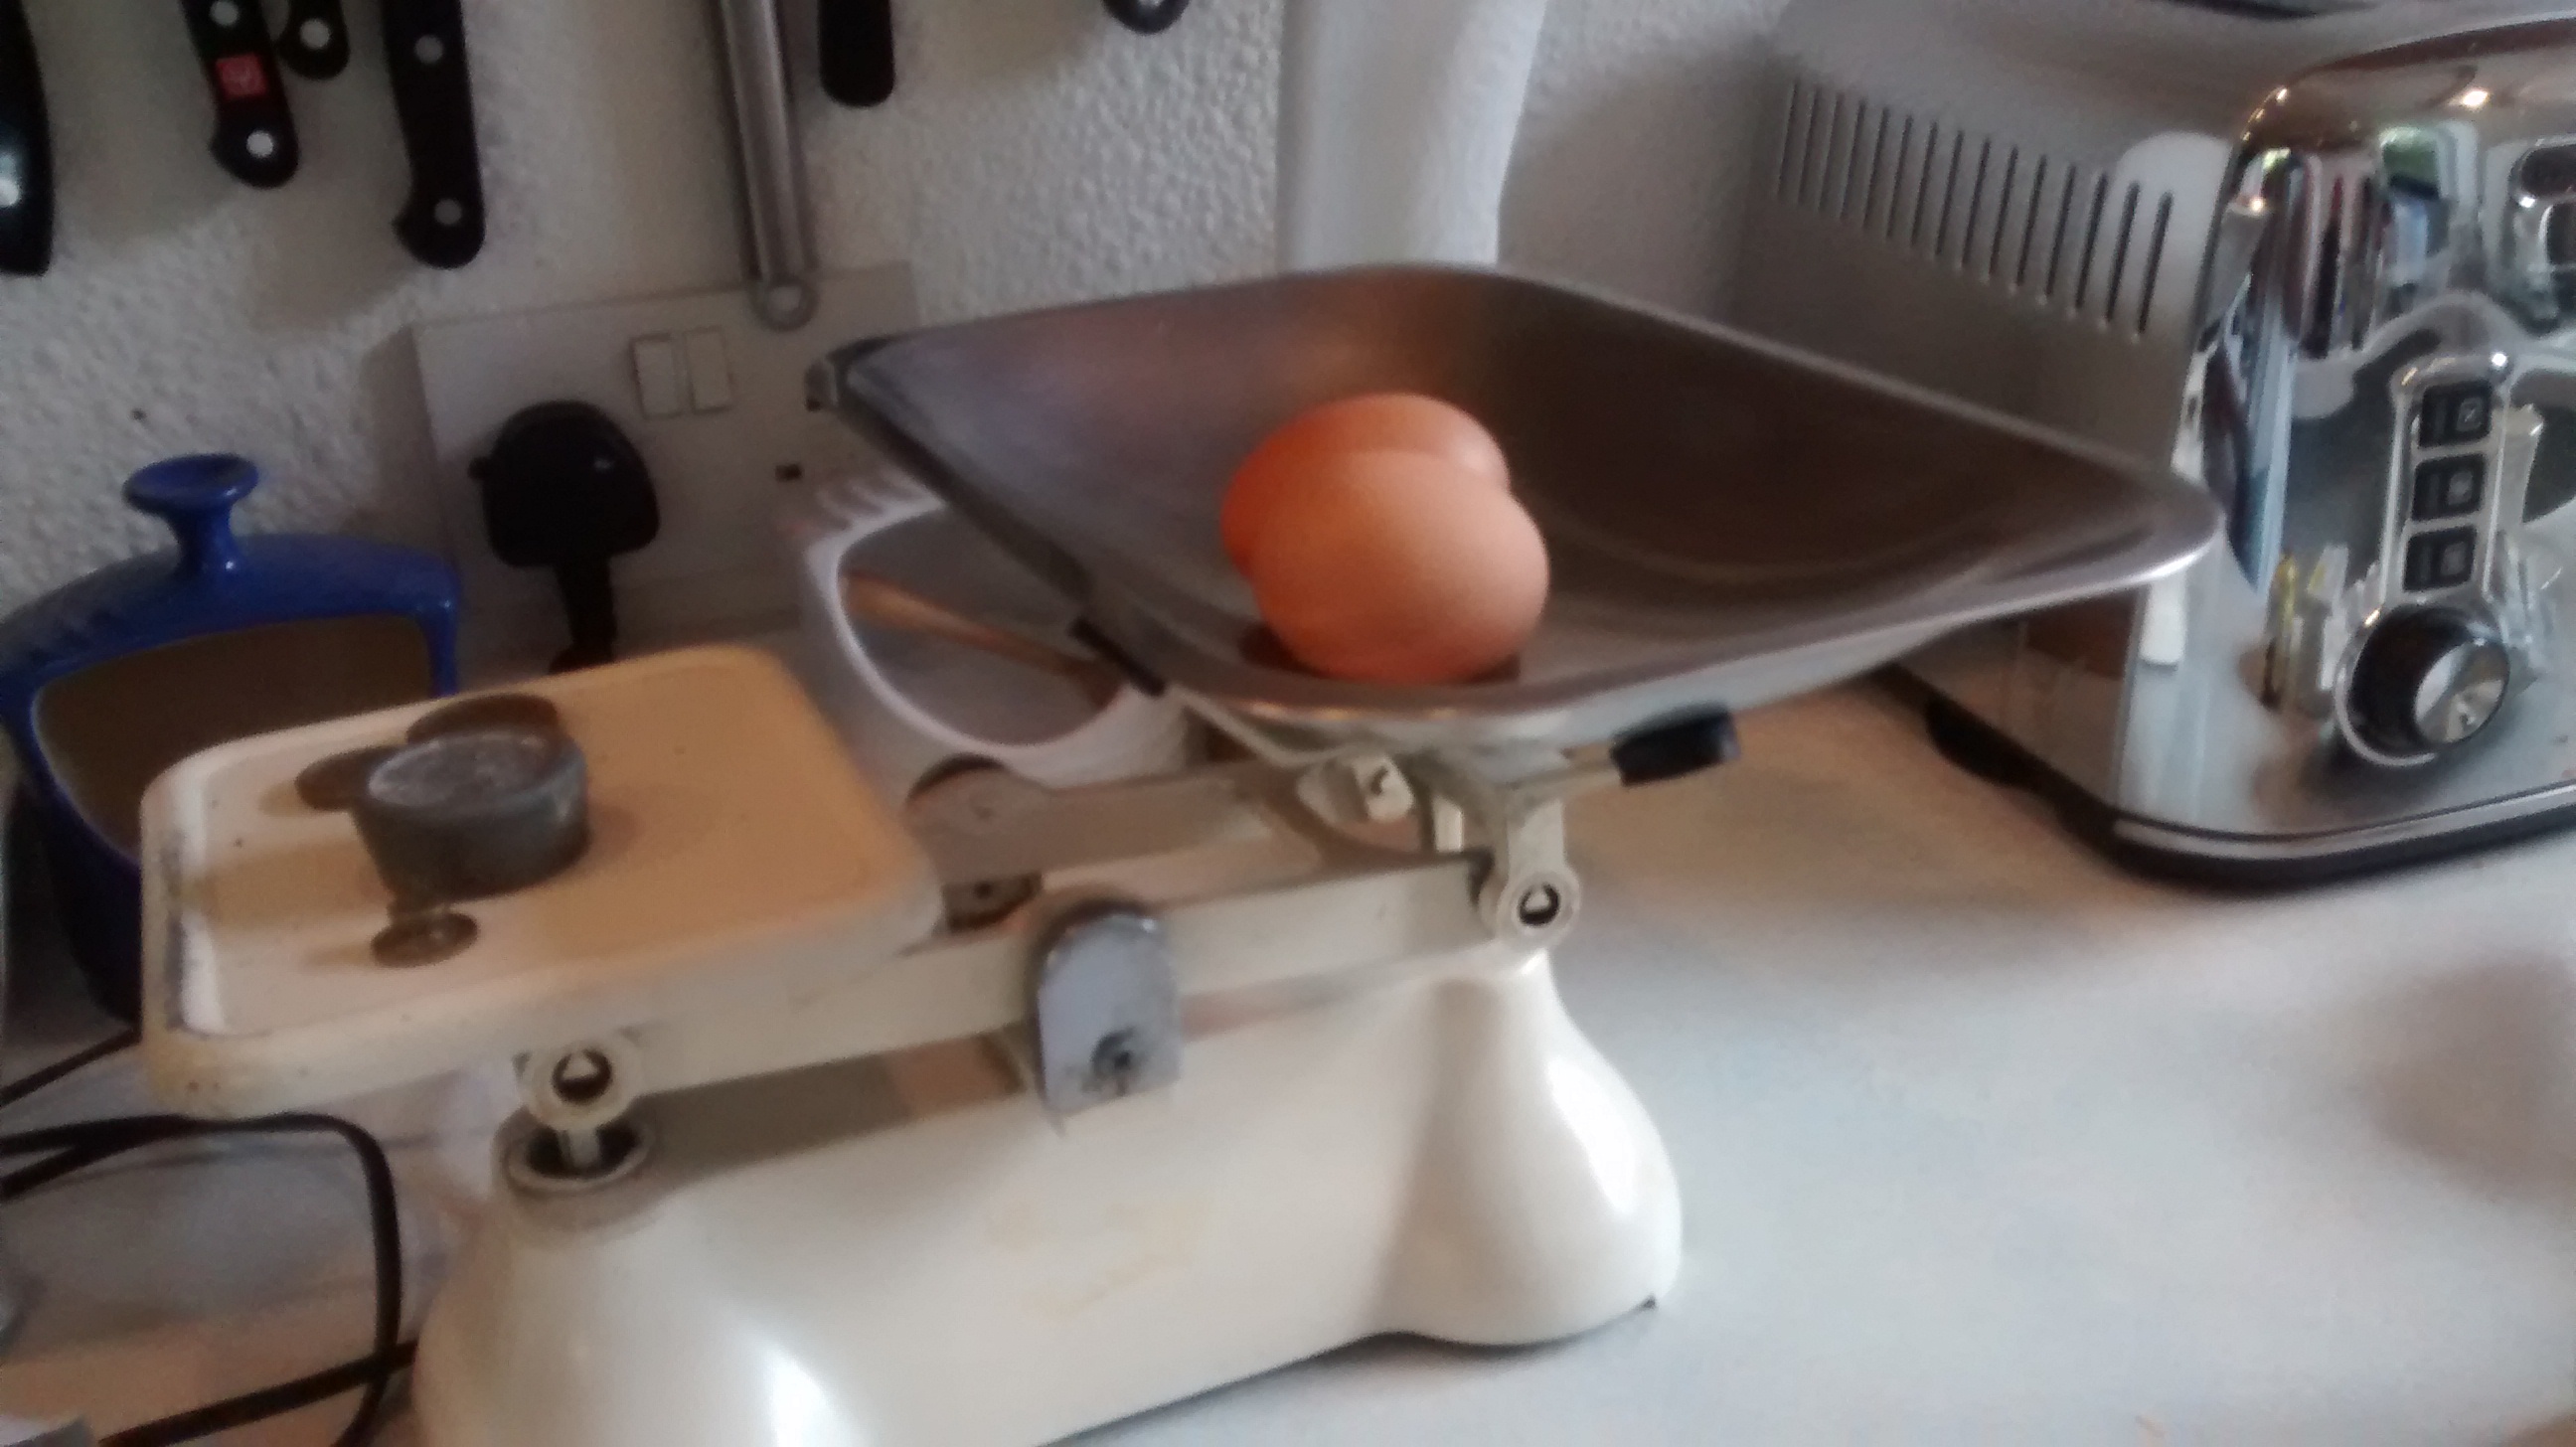
  • You then weigh out the same amount of  butter, caster sugar and flour.
  • At first I thought this was very strange but now find that it gives a very good way of getting the right proportions no matter what size the eggs are.
  • I heard the late Marguerite Patten in an earlier recorded programme on the radio a few weeks ago saying that Victorian cooks often  used this method. 
  • Cream together the butter and sugar until it is light and fluffy.
  • Add the eggs, one by one whisking again until the the mixture is light and fluffy again.
  • Seive the flour and mix in the baking powder.
  • Fold in the flour with a metal spoon taking not to over mix the mixture and knock out all the air.
  • Divide the mixture evenly between the 2 prepared tins.
  • Bake in the centre of the oven for around 25 to 30 minutes  – the cake should  be golden brown and be clean when a cake tester is used.
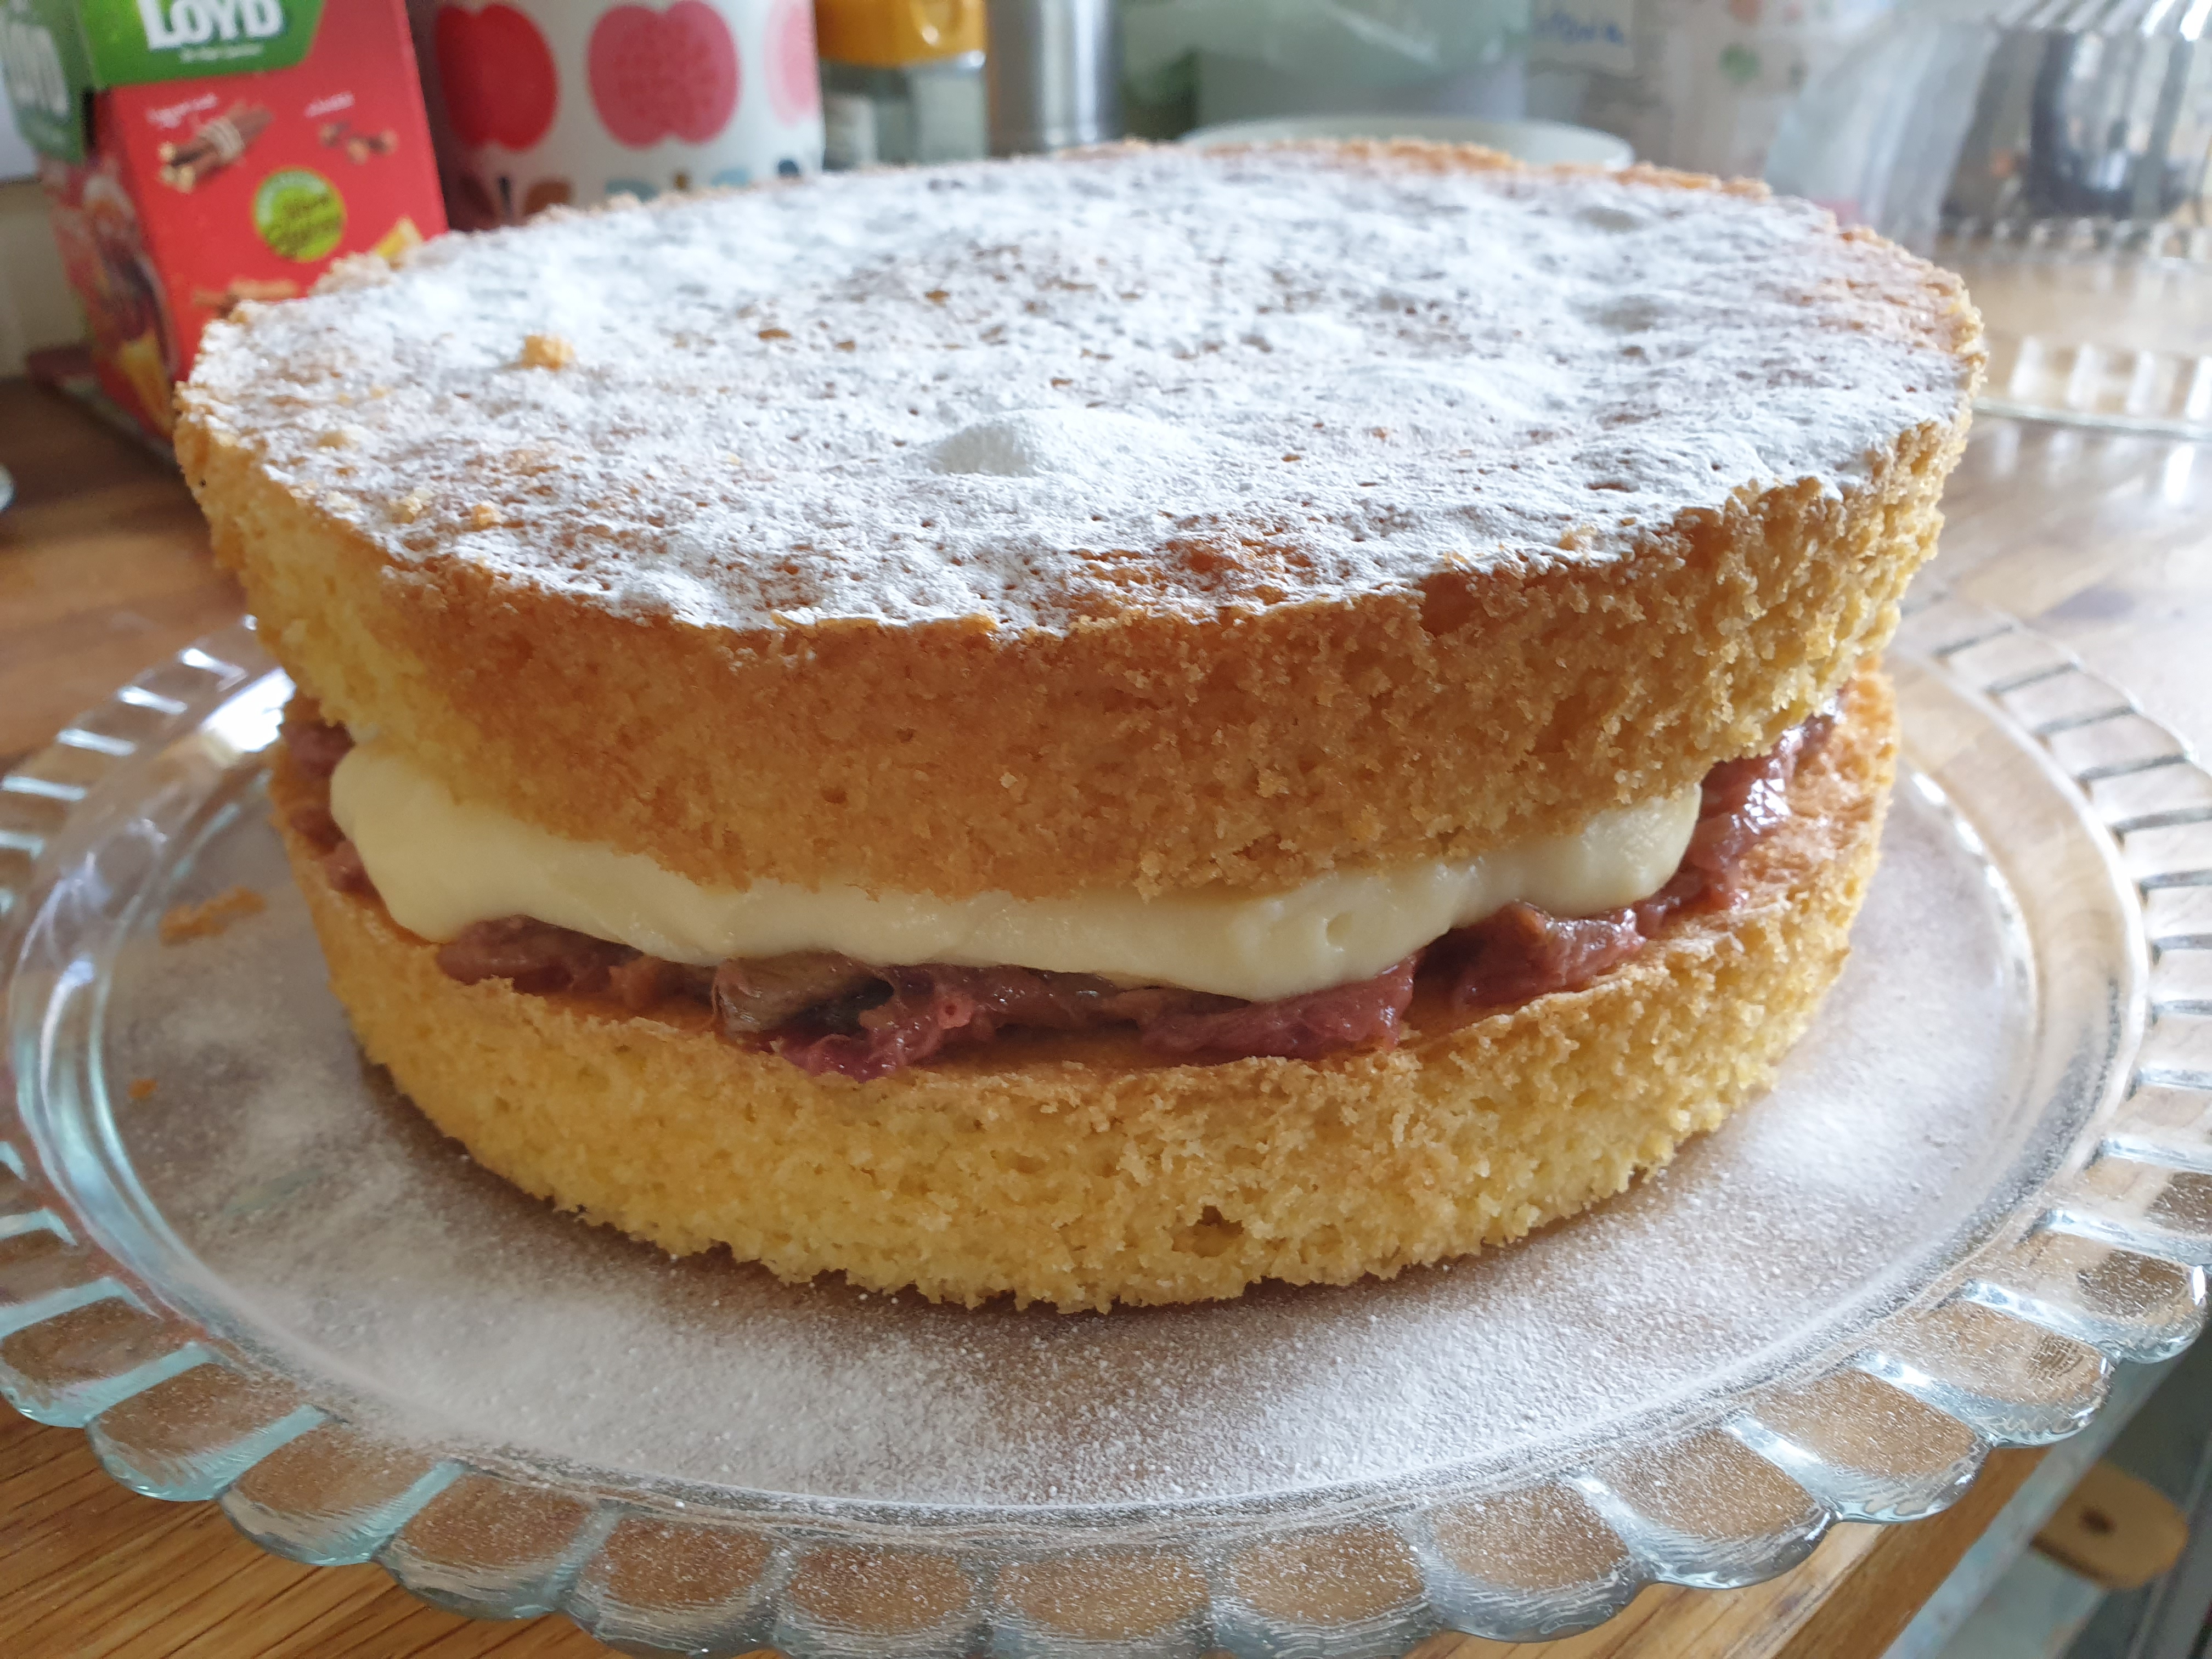
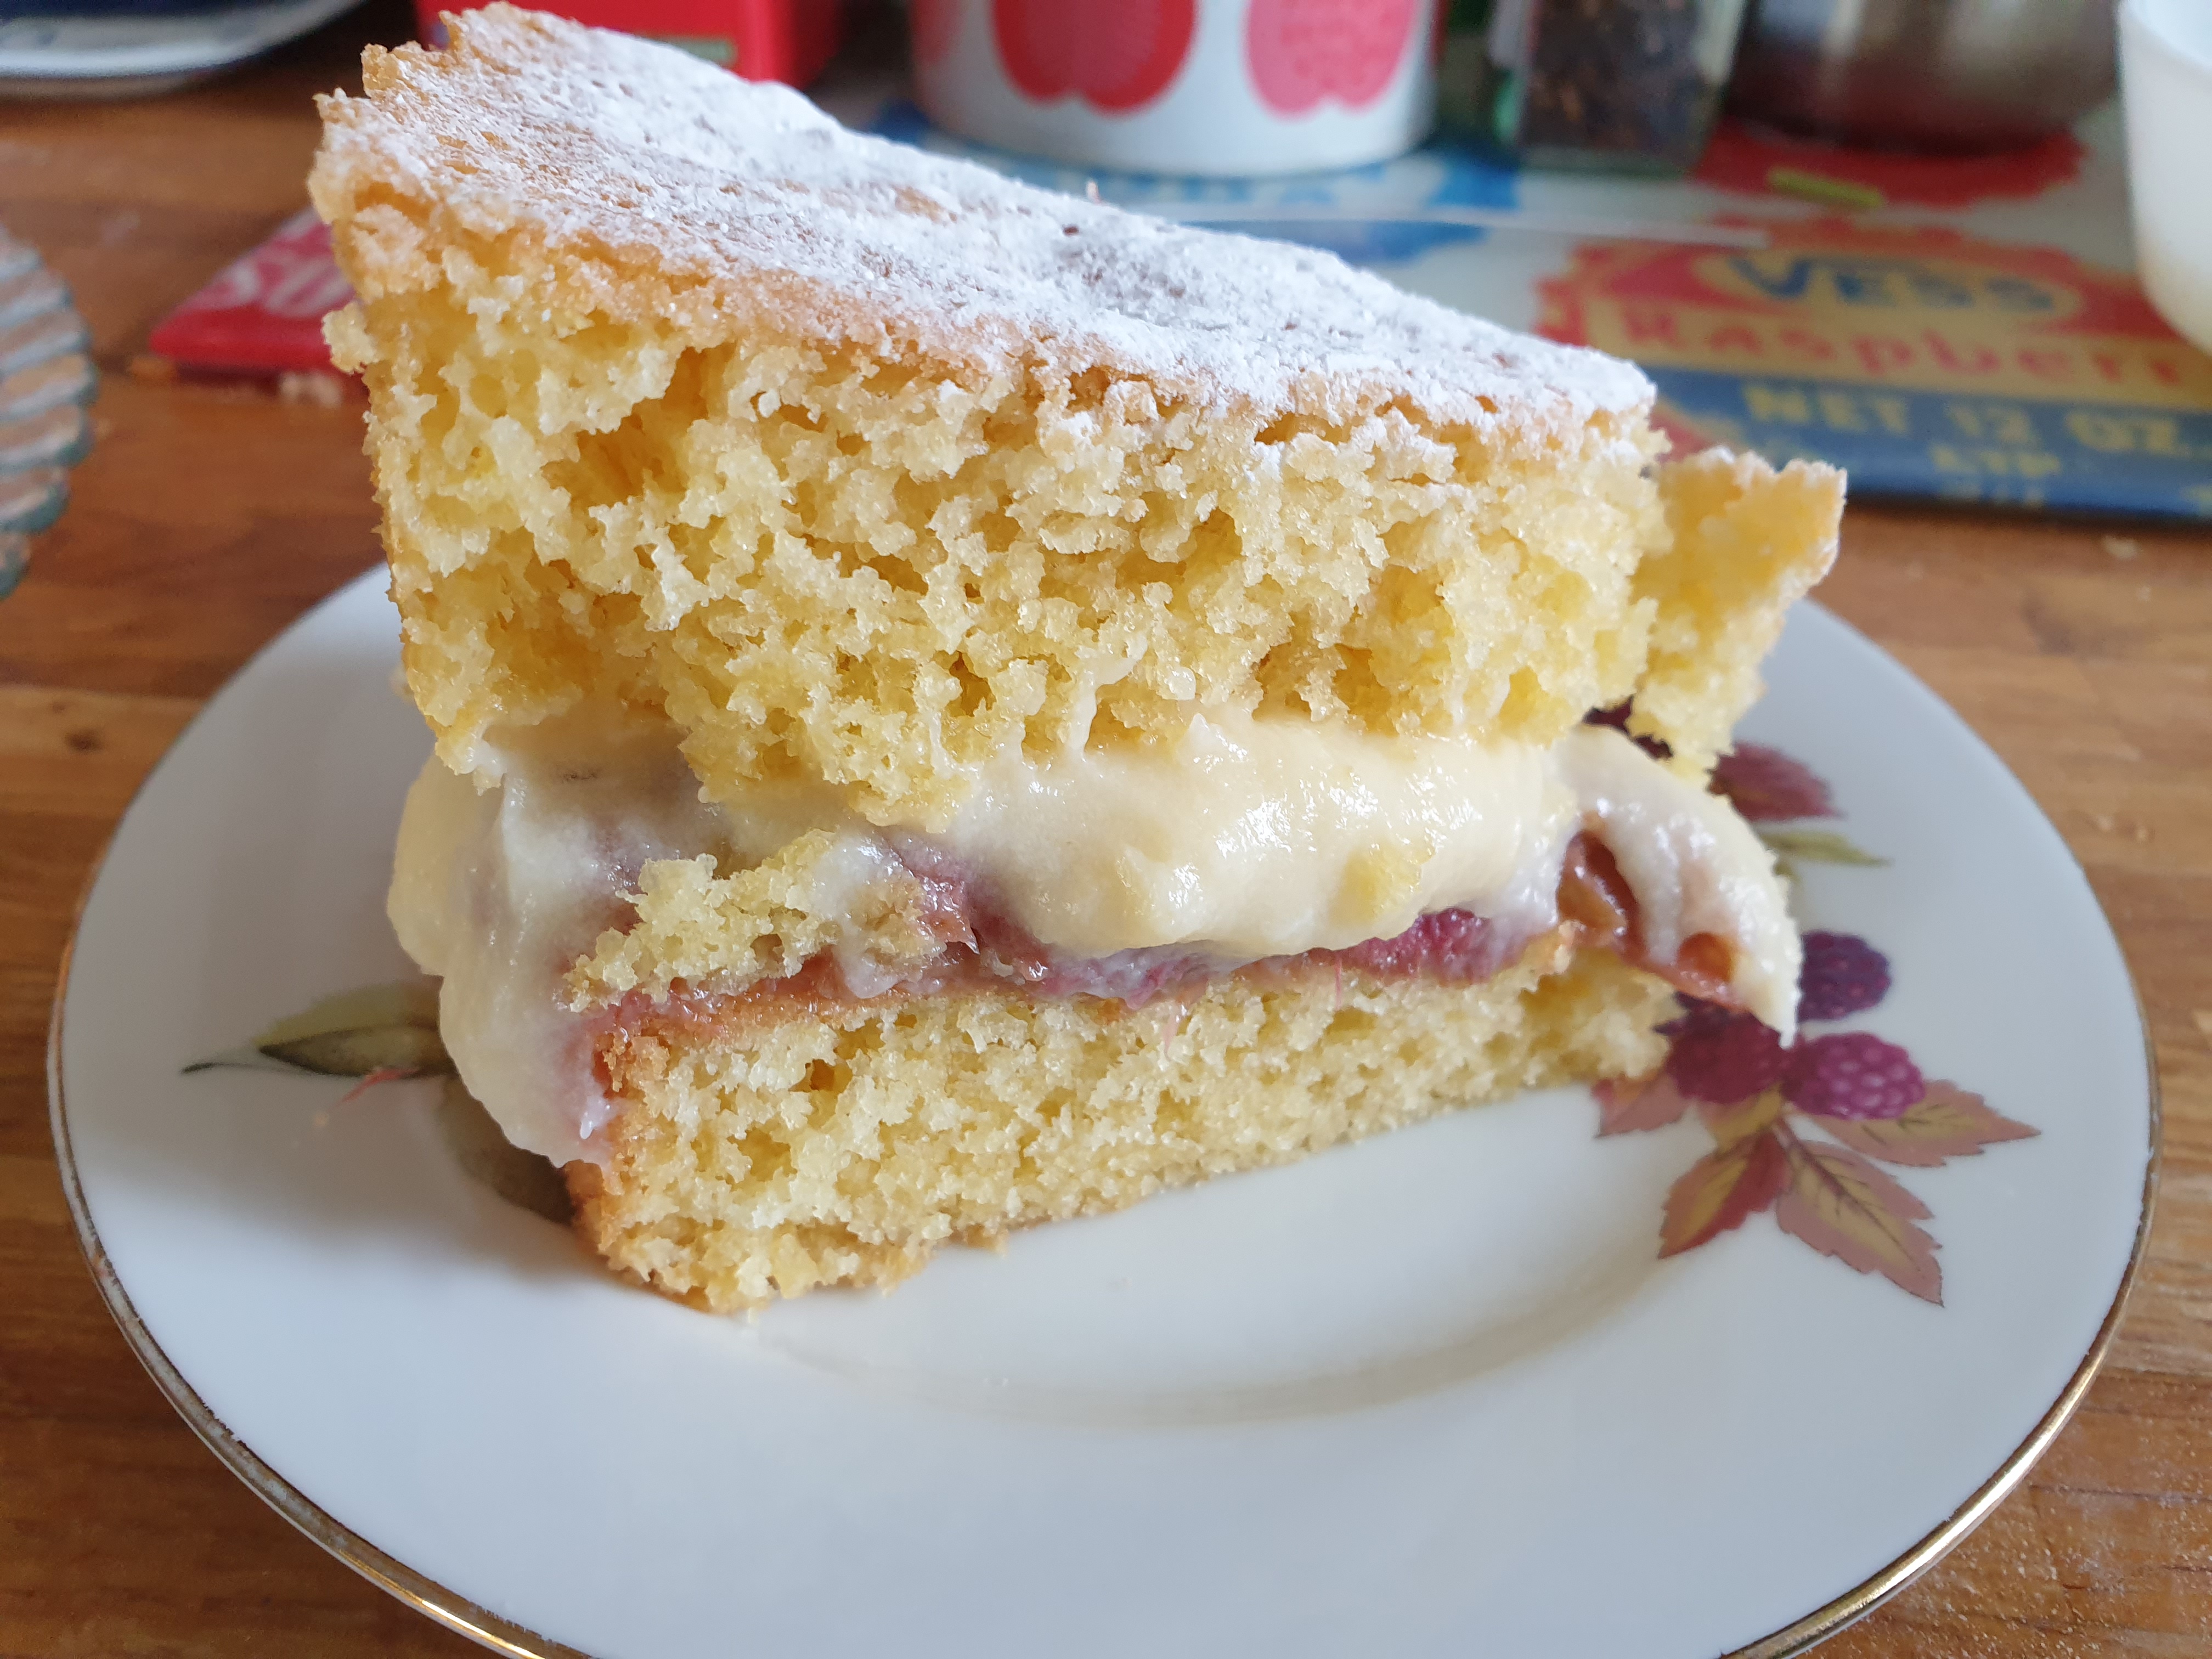
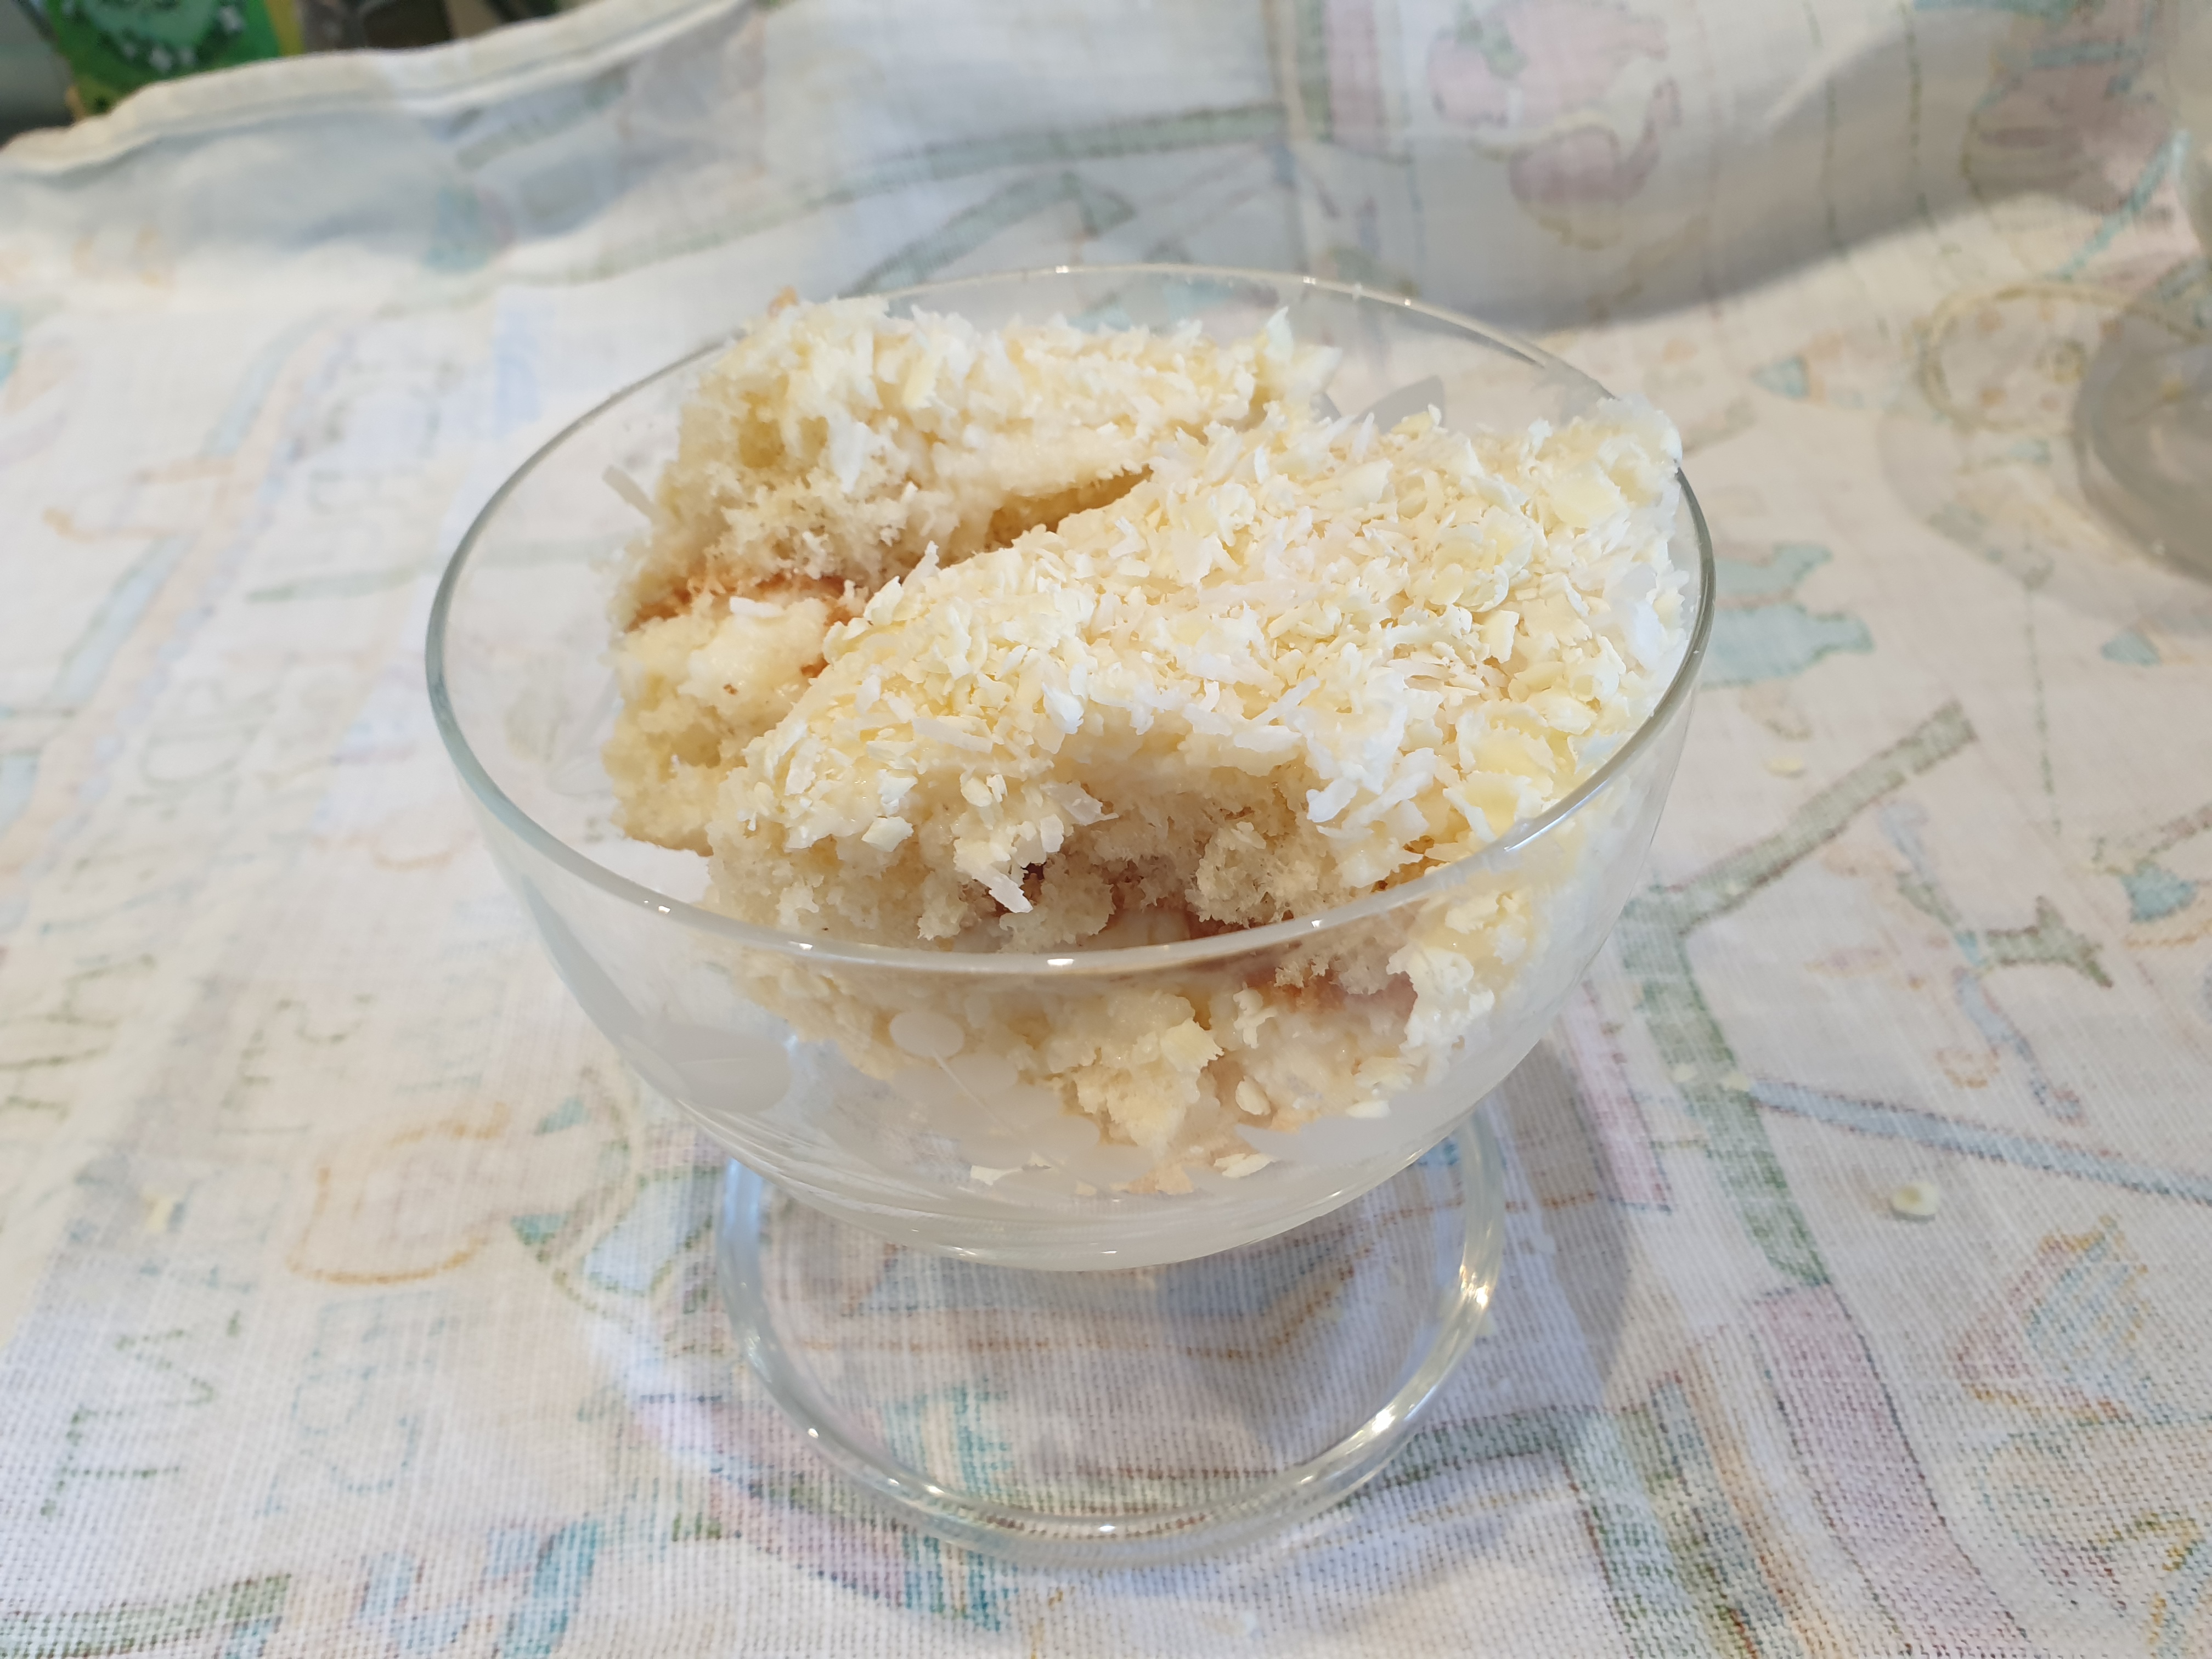
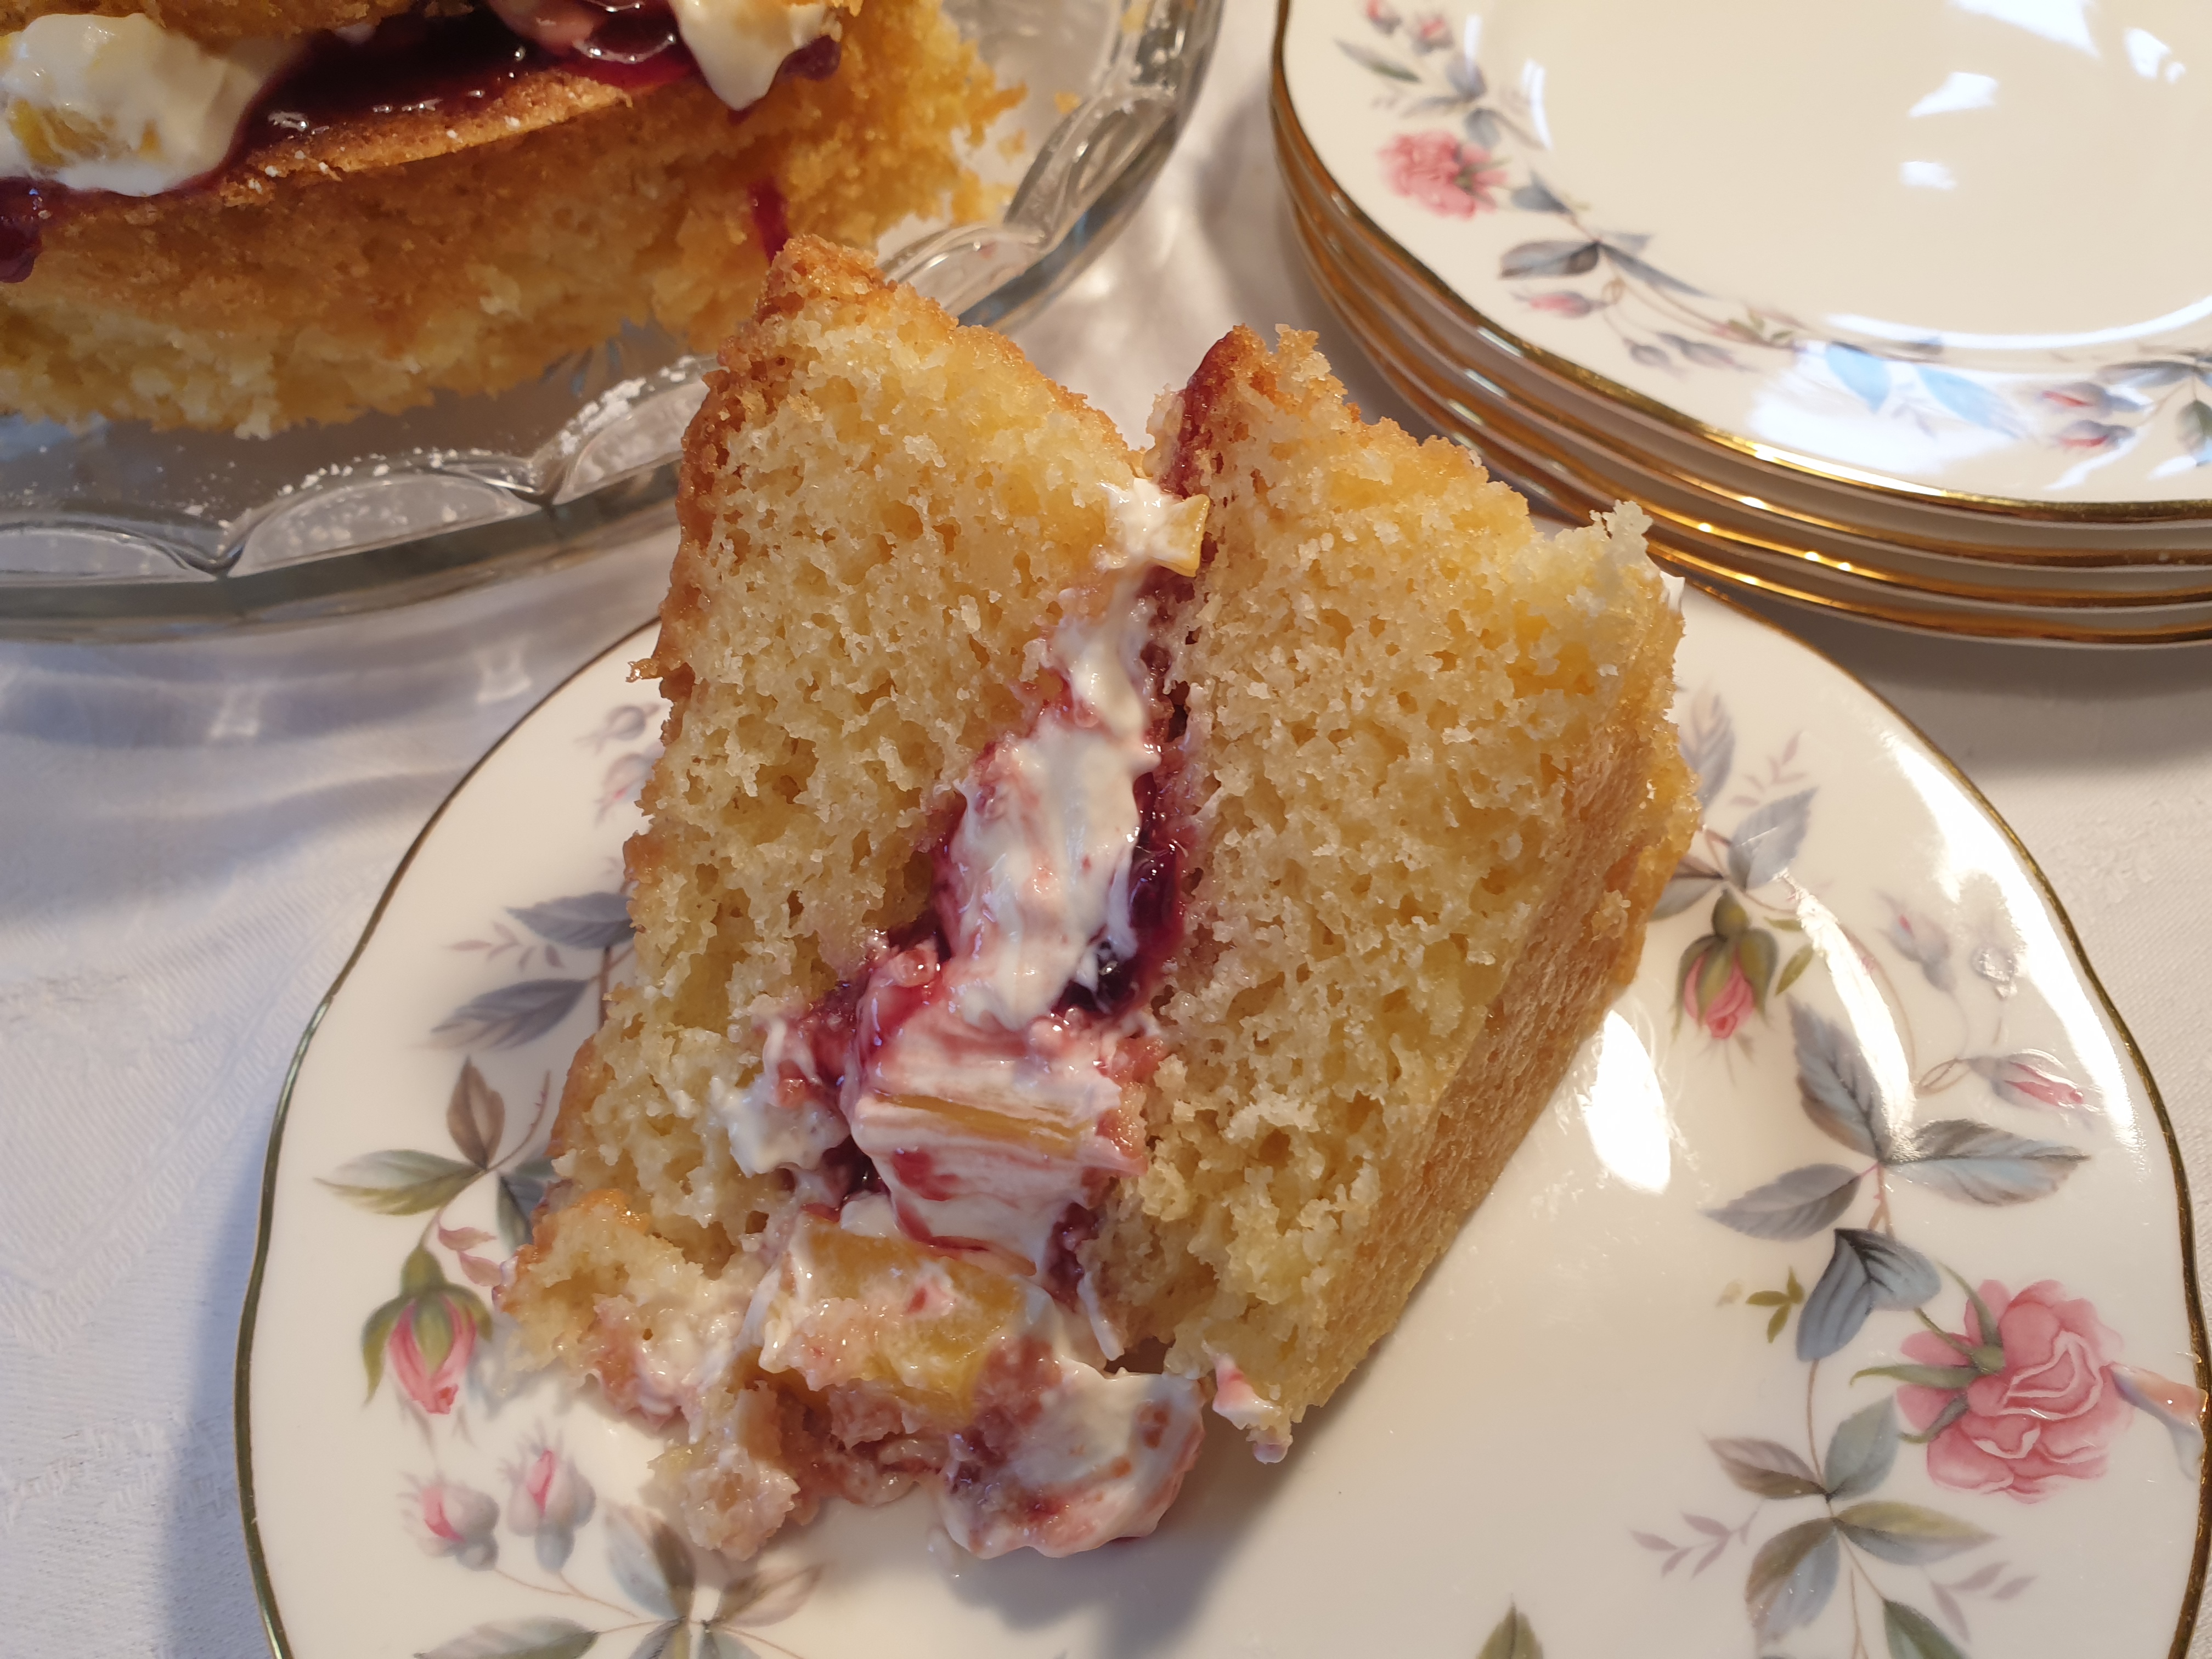
Layer up the Cake

  • Place one of the sponge cakes on a glass plate or stand.
  • Spread the rhubarb over the cake up to the edge.
  • Spread all the budyń over the rhubarb up to the edge.
  • Gentle place the second cake on top.
  • Dust lightly with icing sugar.

Rafaelo Dessert

  • Raffaello chocolates were first made in 1990 by the Italian firm Ferrero. 
  • I have noticed that they are very popular in Poland and nearly always on sale in Polish shops in England.
  • They contain: almonds, wafer, white chocolate and coconut.
  • I have been looking for a definitive recipe for a Raffeallo or Rafealo tort based on this confectionary.
  • There are just so many different ideas on how to make this.
  • I have found a vast number of variations including no-bake versions using biscuits or sponge fingers.
  • I then looked at the more baked ones.
  • The cake most used is a fat free sponge – sometimes this includes ground almonds.
  • The filling is a creamy budyń (Polish custard) with large amounts of added butter,
  • Some versions use white chocolate in their ingredients.
  • The tort is topped with desiccated coconut.
  • The tort is often baked in a square or rectangular tin and each served piece is usually square.
  • However a circular one might be easier if using homemade biszkopt – sponge cake.
  • *
  • I decided to make a lighter dessert, instead with a coconut budyń and sponge cake and a lot less butter.
  • I used a 18cm fat free sponge made with two eggs – cut into two layers.
  • My first attempt was getting the budyń right.

    INGREDIENTS for budyń

  • 500ml milk
  • 1 tablespoon of butter
  • 2-3 tablespoons of granulated sugar
  • 3 egg yolks
  • 3 tablespoons of potato flour (or cornflour)
  • 50 – 80g desiccated coconut & 2 tablespoons
  • 50g white chocolate – coarse grated

Method for budyń

    • Put 300ml of the milk, the butter and sugar into a saucepan.
    • Heat gently till the butter has melted and the sugar dissolved, stirring all the time.
    • Bring this to the boil for a few seconds and then take off the heat.
    • Blend the potato flour with the rest of the milk (200ml) and with the egg yolks.
    • Add some of the boiled mixture to this and stir well.
    • Add this mixture to the rest of  the boiled mixture and stir well.
    • Put the pan back on the heat and bring back to boiling point, stirring gently.
    • Keep at boiling for 1 minute, stirring all the time.
    • Add in the 80g of coconut.
    • Leave to cool.
    • *
    • Use a glass dish and layer up cake, budyń, cake and budyń for the top.
    • Sprinkle the 2 tablespoons of coconut and grated chocolate on the top.
    • Chill in the fridge before serving
OPTION
  • Make the budyń with 750ml of milk and 4 egg yolks.
  • Layer up with some budyń first, then cake, budyń, cake, budyń as before.

Thoughts

  • I liked the version with more budyń. (750ml milk)
  • This was more like a dessert.
  • The version using 500ml of milk was more like a cake with filling.
  • However – they were both voted delicious.

Poppy Seed – Tort

  • Today is 31 December 2023 and this will be my 590th post.
  • Thank you to everyone who reads any of them.
  • *
  • Poppy seed cakes are a very Christmas time thing in Polish cookery.
  • But of course can be found all through out the year as well.
  • This could be called a makowiec but it is light and more a tort (sponge layer cake).
  • I got a packet of ground poppy seeds (for the first time) and this recipe was on the back.
  • I tried it out and it is light, fluffy and delicious.
  • It is good just on its own but the suggestion is to add butter cream.
  • I used a rum flavoured butter cream but think, vanilla, rum or lemon rind would also work well.
  • You can cut the cake in half and sandwich it together or put the butter cream on the top.
  • The cake takes 6 eggs and was baked in a 24cm diameter round tin.
  • It is left to cool in the tin and does sink slightly in the middle.
  • I think next time using 2 sandwich type tins would be better or
  • Make ½ the quantity.

INGREDIENTS

  • 6 eggs separated.
  • 200g granulated sugar
  • 200g ground poppy seeds (a whole packet)
  • 3 tablespoons of semolina 
  • 1 teaspoon of baking powder
  • pinch of salt

Method

  • Grease and line the base of a 24 cm round tin.
  • Pre-heat the oven to GM4 – 180°C.
  • Mix together the poppy seeds, semolina and baking powder.
  • Whisk together the egg yolks and sugar till thick and creamy.
  • Fold in the poppy seed mixture.
  • Add a pinch of salt to the egg whites and whisk till stiff.
  • Fold the whites into the rest of the cake mixture.
  • Put into the cake tin and smooth over the top.
  • Bake for 40 – 45 minutes.
  • Leave to cool in the tin.
  • The cake may drop slightly in the middle.
  • *
  • Serve dusted with icing sugar or
  • Cut in half and sandwich with a butter cream of your choice – vanilla, rum or brandy or lemon rind.

Duchess & Meakin poppy tea plates.

Orange Tort

This is my 450 post – I hope everyone enjoys reading them – I love doing the research, cooking and writing.

  • My mother used to make an orange sponge cake with orange icing.
  • This was one of my favourite cakes.
  • This is a fancier version, sandwiched with orange butter cream with orange icing on top.
  • I made a small version but it is easy enough make a larger version.

Orange Cake – Ingredients

  • 2 Eggs – weight in shells
  • Equal weight of:
  • Butter
  • Caster Sugar
  • Plain Flour
  • *
  • 2 teaspoons of baking powder
  • Grated rind of 1 orange
  • 30ml orange juice.

Orange Cake – Method

  • Grease and line the base of 18cm sandwich tins.
  • Weigh the eggs and then the other ingredients.
  • Cream together the butter and sugar until it is light and fluffy.
  • Add the orange rind.
  • Add the eggs, one by one whisking until the mixture is light and fluffy again.
  • Stir in the orange juice.
  • Add the baking powder to the flour.
  • Sieve the flour.
  • Fold in the flour with a metal spoon taking not to over mix the mixture and knock out all the air.
  • Divide the mixture evenly between the 2 prepared tins.
  • Bake in the centre of the oven for around 20 to 25 minutes.
  • The cakes should be golden brown and be clean when a cake tester is used.
  • Leave to cool on a wire rack.
  • Make sure the cake is completely cold before assembly.

Note – You need 1 large orange or 2 small oranges for the butter cream & icing

Orange Butter Cream – Ingredients

  • 50g butter (unsalted is best)
  • 100g icing sugar (approx)
  • Grated rind of ½ large orange (or 1 small)
  • 1 tablespoons of orange juice

Orange Butter Cream – Method

  • Cream the butter and icing sugar.
  • Add the rind and juice and mix well.
  • Adjust thickness with icing sugar if necessary. 

Orange Icing – Ingredients

  • 100g icing sugar (approx)
  • 1 tablespoon of  orange juice
  • Grated rind of ½ large orange (or 1 small orange)

Orange Icing – Method

  • Mix the juice and the rind .
  • Mix together with the icing sugar till smooth and thick.
  • Adjust the icing for top of cake or thick as a dripped down glaze.

Assembling the Cake

  • Do this when the cake is cold.
  • Save all the juice not required in the cake, buttercream and icing.
  • Divide the juice into two.
  • Place one round of cake onto a serving plate.
  • Skewer the cake with a wooden BBQ skewer
  • Spoon half of the orange juice over the top of the cake.
  • Leave for 5 minutes.
  • Spread the orange butter cream over the cake.
  • Place the second round of the cake on top.
  • Skewer the top with a wooden BBQ skewer.
  • Spoon the rest of the orange juice over the top of the cake.
  • Leave for a 5 minutes.
  • Spread the spread the orange icing over the top of the cake.
  • Served on Cake Plates by Allertons Ltd Pattern Number ALL5

Tort Melba – Sponge

  • This tort is based on a pêche melba – peach melba dessert.
  • This is a recipe for a large sponge cake, sandwiched with a filling made from yoghurt cheese or cream cheese and chopped tinned peaches plus a thick raspberry sauce.

Sponge Cake

  • Bake two  creamed sponge cakes –
  • Using 4 eggs and equal weights of butter, caster sugar and plain flour plus 2½ teaspoons of baking powder.
  • Bake in 2 x 21 cm anodised baking tins.
  • Leave to go cold completely.

Ingredients – Icing

  • 200g yoghurt cheese or cream cheese
  • 3-4 tablespoons of  icing sugar
  • 2-3 drops of vanilla essence
  • *
  • Peaches drained from a can – chopped
  • *
  • Peach juice from the tin.

Method – Icing

  • Add the vanilla essence to the yoghurt cheese.
  • Add the icing sugar bit by bit to the yoghurt cheese until you get the desired sweetness.
  • This does not want to be too sweet.
  • Mix in the chopped peaches
  • *
  • Icing sugar to dust

Ingredients – Sauce

  • 100g of raspberry jam
  • 50ml of water

Method – Sauce

  • Put the jam and water into a small saucepan.
  • Heat gently and stir with a wooden spoon.
  • Heat until the sauce is thick and smooth.
  • Leave to cool.

Assembling the cake

  • Place one of the cakes onto a serving plate or stand.
  • Prick the cake with a wooden skewer.
  • Sprinkle half the peach juice over the cake.
  • *
  • Spread half the raspberry sauce over the cake.
  • Spread the peach filling on the cake.
  • Drizzle the rest of the raspberry sauce on the filling.
  • *
  • Prick the other cake with a wooden skewer.
  • Place the second cake on top of the filling.
  • Sprinkle the rest of the peach juice over the cake.
  • *
  • Dust with icing sugar before serving.

Duchess – Bramble Rose tea plates from the 1960s

Options

  • You could make more filling and slightly cover the sides of the cake – semi-naked.
  • You could make more filling and ice the top of the cake as well.

Tort Melba – Meringue

  • A Polish lady that I had not seen for many years came to visit me.
  • We sat in the garden chatting over coffee and cake.
  • She mentioned a cake she had not had for many years – Tort Melba.
  • She told me it was based around Pêche Melba – Peach Melba.
  • However she could not remember the recipe.
  • I said I would look the recipe up and make it for her.
  • *
  • Recipes used peaches, raspberry sauce and instead of vanilla ice cream a vanilla flavoured yoghurt cheese or cream cheese.
  • *
  • I found there are 3 types:
  • *
  • A meringue version –  tort bezowyrecipe below.
  • *
  • Several versions used two rounds of meringue sandwiched together.
  • It is easier to make a nest (Pavlova style) and place the fillings in that.
  • *
  • A sponge cake version –  2 will be posted soon.
  • A layered jelly version – I tried several versions but was not happy with any of the results.

Ingredients – Meringue

  • 4 egg whites
  • 200g caster sugar
  • 1 teaspoon of potato flour or cornflour
  • 1 teaspoon of white wine vinegar
  • 2-3 drops of vanilla essence

Method

  • Use the loose base of a baking tin 24cm in diameter.
  • Lightly grease the circle.
  • Cut a 24cm circle of greaseproof and stick it on the metal circle.
  • Place the circle on a large baking tray – one without sides is best.
  • Pre-heat the oven to GM1 – 140°C.
  • Whisk the egg whites until stiff.
  • Add the sugar and whisk again till stiff.
  • Fold in the potato or corn flour, the vinegar and vanilla essence.
  • Using up to ½ of the mixture cover the circle on the tin.
  • Using the rest of the meringue put spoonfuls around the edge.
  • Bake for 80 minutes.
  • Turn off the oven and leave the meringue inside for 20 minutes.
  • Take out and leave to cool completely before filling.
  • *
  • Place the yoghurt cheese filling in the centre of the meringue nest.
  • Add the chopped peaches.
  • Drizzle the raspberry sauce over the top. 

Ingredient – Filling

  • 200g yoghurt cheese, curd cheese or cream cheese
  • 2 – 3 tablespoons of icing sugar
  • 2-3 drops of vanilla essence
  • *
  • 1 tin of peaches, drained and chopped
  • *
  • Raspberry sauce made with 4 tablespoons of raspberry jam and 1 tablespoon of water – heated together for a few minutes and cooled.

Royal Doulton – Counterpoint tea plates – 1973 – 1987

Chocolate Limes – Torcik

In England there are some old fashioned sweets called chocolate limes, which I really like. They consist of a crunchy lime coating over a dark chocolate paste centre.

I have been making several chilled cakes – torcik – and thought I would try out a variation based on this chocolate and lime idea.

This torcik is a variation on ones that I made previously with different fruits and bases.

I tried out a few variations on the proportions of the ingredients and decided that just having two layers worked best with a chocolate flake decorations on the top.

  1. Biscuit & chocolate base
  2. Sweet curd cheese with lime jelly

Ingredients

  • 100g of plain biscuits such as petit beurre, morning coffee or rich tea
  • 40g butter
  • 50g dark  chocolate
  • *
  • 300g twaróg or yoghurt cheese (could use full fat cream cheese)
  • 150g icing sugar
  • 80g butter
  • 4 yolks
  • 1 packets of lime jelly
  • *
  •  Cadburys flake or grated dark chocolate to decorate.

Method

  • Use a 22cm diameter loose bottomed or spring-form tin.
  • This is a smaller size than for my previous ones.
  • Lightly rub the base with some butter.
  • *
  • Crush the biscuits into small crumbs.
  • Melt the butter and chocolate gently, stirring to prevent burning.
  • Add the biscuit crumbs and mix well together.
  • Put the mixture into the base of the tin and press it down firmly.
  • Leave till it is cold.
  • *
  • Dissolve the lime jelly in 150ml of boiling water and leave to cool.
  • The tricky bit is having the jelly at the right temperature to use.
  • *
  • Cream together the butter and icing sugar.
  • Add the egg yolks, one by one, alternating with the twaróg.
  • Mix thoroughly.
  • *
  • Gently mix in the cool jelly.
  • Pour the mixture over the base.
  • Level the top.
  • *
  • Leave for around 30 minutes so the jelly is starting to set.
  • Decorate  the top with sprinkled grated chocolate or flakes or both.
  • Leave to set – best in the fridge – for at least 3 hours.
  • Take great care when removing the torcik out of the tin.
  • Use a long thin spatula to ease the edge.
  • Use a tin to place the cake tin on to move it apart from the base.


Tea plates Waterlily by Taylor and Kent

Cherry Torcik

  • The inspiration behind the flavours in this torcik is from a Black Forest Gateau, which is a chocolate cake with sour cherries and Kirshwasser – a cherry spirit, and often with cream.
  • It is claimed to have been invented in 1915 but other sources say it was in the 1930s.
  • It was very popular in Britain in the 1970s and 1980s.
  • This torcik is a variation on two that I made previously with different fruits and bases.

When making a torcik you need time to let one layer set before starting on the next.

This torcik is composed of 3 layers

  1. Chocolate sponge base
  2. Sweet curd cheese with black cherry jelly
  3. Drained bottled cherries in black cherry jelly

Ingredients – base

Ingredients – cherry layers

  • 300g twaróg or yoghurt cheese (you could use full fat cream cheese)
  • 100g icing sugar
  • 80g butter
  • 4 yolks
  • 1 packet of black cherry jelly
  • *
  • Sweet or sour bottled cherries
  • 1 packet of black cherry jelly

Method

  • Use a 22cm diameter loose bottomed or spring-form tin.
  • Lightly rub the base and sides with some butter.
  • *
  • Melt the butter and chocolate and leave to cool a little.
  • Stir in the cake crumbs.
  • Mix together well.
  • Place on the base of the tin and pat down with a spoon.
  • Leave to go cold.
  • *
  • Dissolve the cherry jelly in 150ml of boiling water and leave to cool.
  • The tricky bit is having the jelly at the right temperature to use.
  • *
  • Cream together the butter and icing sugar.
  • Add the egg yolks, one by one, alternating with the twaróg.
  • Mix thoroughly.
  • Gently mix in the cool jelly.
  • Pour the mixture over the sponge base.
  • Level the top.
  • Leave to set – best in the fridge – for at least 3 hours.
  • *
  • Mix up the black cherry jelly as per the instructions with 500ml of boiling water.
  • Leave the jelly to cool.
  • *
  • Drain the cherries from the juice.
  • Arrange the drained cherries over the black cherry/cheese layer.
  • Gently put the black cherry jelly over the cherries – use one spoon to pour this over the back of a second spoon.
  • Leave it to set again in the fridge – can take several hours.
  • Take great care when removing the torcik out of the tin.
  • Sprinkle some chocolate curls or flakes around the serving plate.


Tea Plates by Royal Crown Derby – Derby Posies  – 1972


Torcik – with Bottled Blackcurrants

This torcik is a variation on two that I made previously with different fruits and bases.

When making a torcik you need time to let one layer set before starting on the next.

This torcik is composed of 3 layers

  1. Sponge cake base
  2. Sweet curd cheese with lemon jelly
  3. Drained bottled blackberries in blackcurrant jelly
  • For the base I used a kefir sponge cake which I cut into thin slices.
  • I adjusted the ingredients in the lemon/cheese mixture from previous ones and did not use egg whites.
  • I used real fruit juice Polish jellies and bottled blackcurrants.


Ingredients

  • 500g twaróg or yoghurt cheese (you could use full fat cream cheese)
  • 200g icing sugar
  • 100g butter
  • 4 yolks
  • 1 packet of lemon jelly
  • 1 packet of  blackcurrant jelly
  • *
  • Thin slices of sponge cake – I used my kefir sponge cake
  • *
  • Blackcurrants drained from a jar of bottled blackcurrants (keep the juice)

Method

  • Use a 25cm diameter loose bottomed or spring-form tin.
  • Lightly rub the base and sides with some butter.
  • Using thin slices of sponge cake make a layer on the base of the tin.
  • *
  • Dissolve the lemon jelly in 150ml of boiling water and leave to cool.
  • The tricky bit is having the jelly at the right temperature to use.
  • *
  • Cream together the butter and icing sugar.
  • Add the egg yolks, one by one, alternating with the twaróg.
  • Mix thoroughly.
  • Gently mix in the cool jelly.
  • Pour the mixture over the sponge base.
  • Level the top.
  • Leave to set – best in the fridge – for at least 3 hours.
  • *
  • Mix up the blackcurrant jelly as per the instructions with 500ml of boiling water.
  • Leave the jelly to cool.
  • *
  • Arrange the drained blackcurrants over the lemon layer.
  • Gently put the blackcurrant jelly over the blackcurrants – use one spoon to pour this over the back of a second spoon.
  • Leave it to set again in the fridge – can take several hours.
  • Take great care when removing the torcik out of the tin.

Coffee set & plates – Counterpoint by Royal Doulton  from 1973 – 1987.

Note

  • Next time I would pour several tablespoons of the juice over the sponge base.
  • Here I put a little of the the juice on the serving plate and let it soak in before serving.


Tort – Jadwiga

I remember my mother making this as a no-bake tort using sponge fingers.

She called it tort Jadwiga.

I have not been able to find a recipe for this other than in my notes and now I wonder whether she called it after me!

Partly because I did not have any sponge fingers and partly because I wanted to make a round cake – I decided to make this by baking two round fat free sponges.

Three are 4 parts to the ingredients list:

  • Fat free sponges – I used a quick English style version
  • Juice of a large orange
  • Rum & Almond butter icing
  • Toasted flaked almonds to decorate.

Ingredients -Fat Free sponge

  • 4 eggs
  • 150g caster sugar
  • 150g self raising flour

Method – Fat Free sponge

  • Pre-heat the oven to GM4 – 180°C
  • Grease and line the base of  two 18cm diameter baking tins.
  • In a bowl whisk the eggs and caster sugar until they are pale and creamy.
  • Gently fold in the flour.
  • Pour the mixture into the tins and bake for 25-30 minutes until golden.

Ingredients – Butter Cream

  • 110g unsalted butter
  • 50g ground almonds
  • 2 egg yolks
  • 2 tablespoons of rum
  • 300g icing sugar (approx)

Method – Butter Cream

  • Cream the butter with around half of the icing sugar.
  • Add the egg yolks and cream again till fluffy.
  • Add the ground almonds and the rum and whisk again.
  • Start adding the rest of the icing sugar until you have a thick butter cream.

Assembling the tort

  • Prick the top of each sponge with a skewer.
  • Place one of the sponges on the cake stand or plate you are going to use.
  • Using a spoon pour half the orange juice over the base of the tort.
  • Put a layer of the butter cream over the base.
  • Put the second cake on top and gently pour the rest of the orange juice over it.
  • Using a small spatula cover the top and sides with the rest of the butter cream.
  • Scatter the almond flakes over the edge of the top and around the sides of the tort.


Tea set by Royal Standard – Lyndale from the 1950s